
| Workshop | Empennage | Wings | Fuselage | Contact |
| <-- August 2012 | October 2012 --> |
Chronological Updates, September, 2012
9 Sep 2012
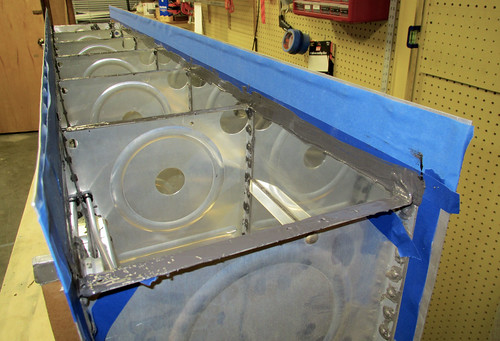
Pulled the nearly-complete left fuel tank back out of the garage now that the shop was clear of other wing parts, and worked on getting the fuel tank attach bracket riveted in. This was the first bit of fuel tank sealant work that I did solo, and it really slows things down. My advice to other builders is to have an assistant whenever you can find one for ProSeal work.
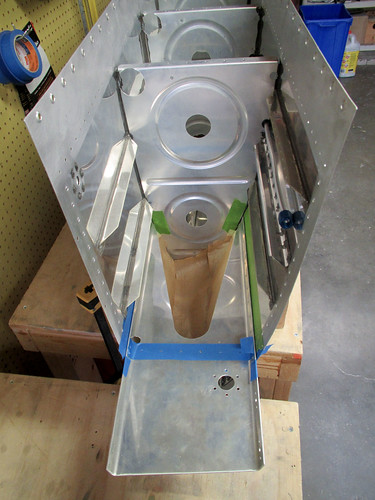
Step one was to put the part in place and mask off all of the areas I wanted to make sure didn't get ProSeal all over them. The pre-taped masking paper worked wonders in the forward end of the bay (below the bracket in the photo above). The tape also helped remind me not to apply sealant or rivets to the holes that are shared by the aft inboard tank rib which will be installed later.
Next I removed the part and cleaned it with acetone. I mixed up one 10g batch of ProSeal and applied it to the sides of the bracket as well as the aft side of the forward inboard rib flange.
The riveting was straightforward, even solo. Because it is the open end of the fuel tank, the reaches aren't terribly awkward and good control of the rivet gun was relatively straightforward. The initial 10g of ProSeal covered the mating surfaces and the caps for all 20 rivet shop heads. I mixed up a second 10g batch to cover a few small pinholes I had discovered elsewhere in the fuel tank sealant joints and to do the fillets around the edges of the tank attach bracket. The underside is a trick because the fillet has to be done blind. This meant just using a (gloved) finger with a big blob of sealant on it to smear it in there. Luckily, no one will ever see that.
With that done I did a thorough inspection of all sealed surfaces and fillets with a mirror-on-a-stick and a flashlight and discovered a number of additional cracks and pinholes that I wasn't happy with so I decided to make a third 10g batch of sealant to fill them. I used the excess to do a second go on the underside fillets of the tank attach bracket since it was difficult to do any meaningful spot touch-ups there. It's a mess under there now, and there's way more sealant there than ideal... but it probably won't have any problems with leaks and that's what I care about most.
Only two major pieces of the fuel tank body left, the aft inboard tank rib and the aft baffle. The rib is the next part but it will take some prep because it needs to have all the fuel sensors attached to it first.
16 Sep 2012
My parents were in town for the weekend so my dad helped me get the inboard aft rib installed on the left fuel tank.
Prior to installing the rib I had to finalize the shape and position of the Princeton capacitance fuel probe. I had one that I had previously bent into position but I had had to un-bend it to get the compression fitting on. When I went to re-position the tube into its original bend positions, the tube failed and broke into two pieces. So I'm going to need to order a replacement there. My advice to anyone using these probes is to only bend them once. For RV-10 builders, you can attach the tube straight onto the rib prior to intalling it, go ahead and torque down the compression fitting, then bend it into position, and finally do the install of the rib without having to modify the bends at all. Do that, and you won't risk a repetitive stress failure of the aluminum like I did. Also, you'll save yourself $200, like I didn't.
Anyway, the bends that you'll want to put into the 24" probe with a 5" bend region at the base is to go 90° down immediately after the compression fitting. Just before the tube reaches the bottom skin, bend it back up at about 135° (see photo, below). Clock the bends such that the tight 135° bend is just forward of the aft-most stiffener in the first bay of the fuel tank. Doing this allowed my probe to pass through the aft hole in the second rib without any risk of touching the sides. I also was not at risk of the probe touching the skin stiffener, so it is only sealant-separated from the fuel tank body at the far (upper) end.
I used a small piece of plastic to hold the upper end of the probe away from the skin, then coated the whole thing with sealant to hold it in place on the skin, being careful not to plug the open end of the probe.
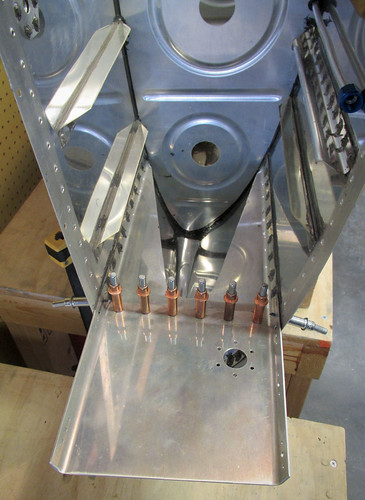
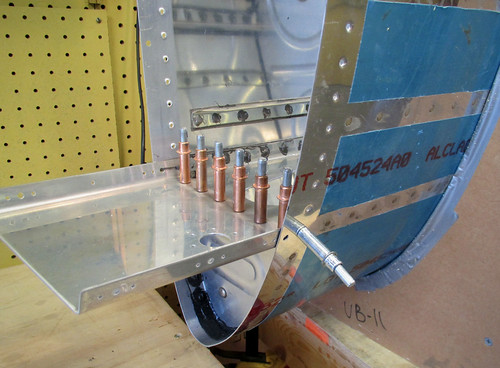
Here's the outside view of the inboard aft rib with the electrical connections in place:
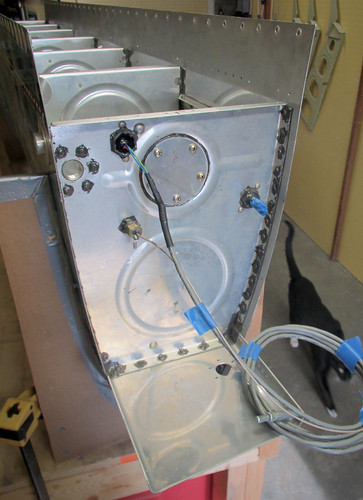
I went ahead and put the final bends in the vent tube and connect it to the bulkhead union fitting. Both sides of the union were coated in sealant since it never needs to be adjusted again. I sealed up all the bulkhead joints on the Aircraft Extras Fuel Guardian sensor and the fuel level probe, both inside and out.
The next step will be to install the aft bulkhead which essentially completes the fuel tank, assuming no leaks. However, before I close it up I'm going to have my EAA technical advisor come by and look at it.
22 Sep 2012
I grabbed a few pieces of aluminum and brass tubing and went up to Bob's shop to use his big bandsaw and lathe today.
First up was reaming out the aileron bellcrank bushings to 0.250" inner diameter (they ship about 0.01" too small). I purchased a hand reamer bit from McMaster-Carr for just this purpose. We loaded the bushing into the rotating half of Bob's lathe and he spun the lathe slowly by hand while I cranked in the bit.
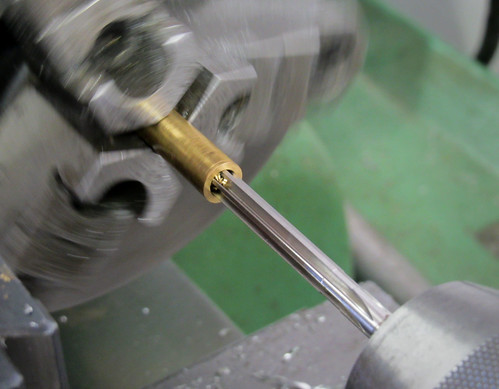
The cutting flutes on the bit weren't quite long enough to go all the way through the bushing, so I had to take out the part and reverse it. This was trivial and in relatively short order both bushings were reamed. An AN4 bolt now slides into them with no trouble at all, but there is no wiggle room between the two parts. With those done, it was time to install the right aileron bellcrank inside the main body of the right wing.
This was easy, though it was akward getting the bolt torqued down through the inspection port in the bottom skin. I couldn't easily take the bottom skin off because I had inserted the bushings into the flap hangers and they are wider than the slot in the skins. I'm going to take those bushings out before I do more aileron actuation work, but for now I was able to get the bellcrank installed through the inspection port.
23 Sep 2012
My EAA technical advisor came by last week to look inside the fuel tank before I sealed it up and he liked what he saw. He did recommend that, before I put the back on it, that I find a way to fill it up with water to test the the rivets that are already done so that if any of them need to be fixed it can be done before the aft baffle is in place. I talked this over with Bob while I was in the shop yesterday and he recommended that I just tape toilet paper to the rivet lines and use some food coloring in the water so that it will show up really easily if there is a leak. So that's exactly what I did:
It didn't take too long to get toilet paper stretched across every rivet line on the skin (I'm less worried about the rivets and accessories on the inboard and outboard ribs because I can always put more sealant on those after the fact without having to open anything up).
To support the ~240 pounds of fuel tank when it is filled with water, I took some industrial carpeting I have a spare roll of and laid it out across my two workbenches with a bunch of slack between, sort of like a larger version of the carpet wing holders on my wing cart:
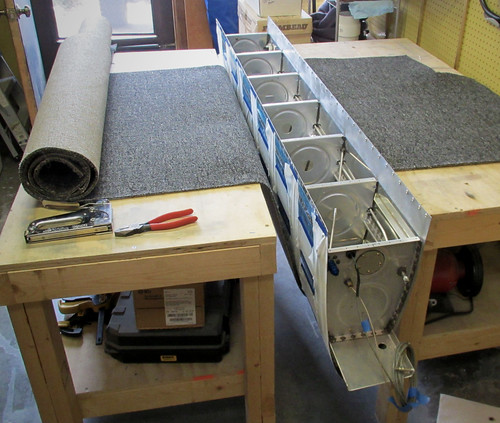
I stapled the carpet down to the table tops with nine 1/2" stapes on each side. I tested that it could handle the weight by standing in the loop and doing a little jump. No problems. I had to carefully put the tank in place so that I didn't disturb the toilet paper lines, but this ended up not being difficult. Then, it was just a matter of filling up a 5 gallon bucket over and over, putting some food coloring into it, and dumping it into the tank.
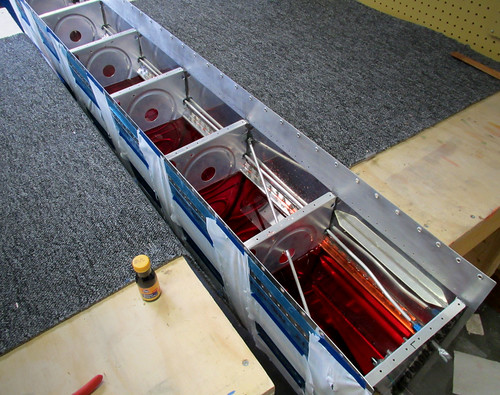
That's the tank at half-capacity. The red water looks almost like Kool-Aid. Yum!
When I got to 27 gallons in the tank, the vent line filled with water and my cheesy duct tape seal on the end was starting to drip, so I started siphoning out the tank at that point. Here's as full as I got it:
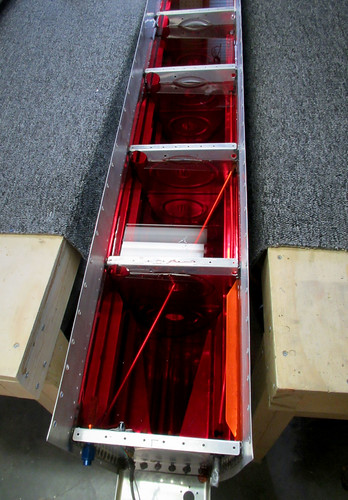
Three gallons short of capacity meant that it was missing the aft-most rivets on both sides and a couple of the rivets on the fuel cap flange, but these are the easiest rivets for me to inspect and access prior to putting the aft baffle on, so I'll just give those an extra close inspection and perhaps a touch-up with ProSeal before I close up the tank.
The siphoning process took a long time, and pouring out 27 gallons of blood-red water into my lawn earned me a weird look from my neighbor... but in the end I was able to undertake this test with no mess and, more importantly, no leaks!! Whew.
Somewhere during this test was the 700th man-hour spent on the plane. And now, it's time to install the aft baffle, I guess.
28 Sep 2012
At the advice of my EAA tech advisor, I bent the fuel vent tube up behind the fuel cap flange as far as I could to add capacity to the tank.
I estimate that this 1.5cm increase in height of the tube entry probably added a gallon of usable capacity to the tank. Woot!
Next, I did a 5-hour marathon session to get the aft baffle onto the left fuel tank. I masked off the bits of the tank skin that extend aft of the aft baffle, then added a small strip of masking that went from the forward edge of the baffle flange rivet holes, aft to my existing masking. This way I can just slather on sealant on the skin where the baffle flanges will contact it, then remove the thin masking line and the aft half of the flange joint will be clear to avoid pillowing of the skin. The plans seem to be really concerned about this possibility and advise that it'll make the fuel tank difficult to mount onto the rest of the wing, so I wanted to make sure I didn't encounter any problems. Here's a picture of the masked fuel tank with all of the sealant in place (I used a 30 gram batch of sealant to set this up):
And here's a corner of the tank once the aft mask line had been removed, exposing the rivet holes:
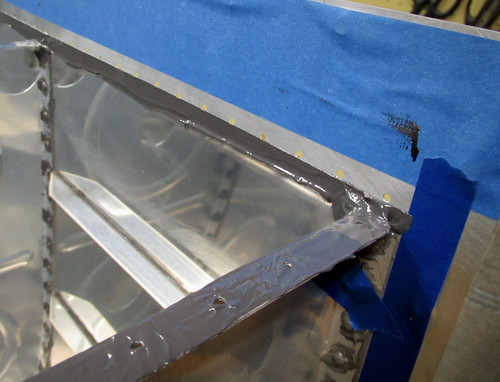
You can also see in that photo the big blob of sealant that I put in the corner to prevent the big hole in the rib corner from leaking.
Lowering the baffle into place wasn't a problem. It took awhile to get all of the clecos into place on the skin/flange joints (the plans instruct to fill every hole). I then mixed up a fresh 10 gram batch of sealant and set about riveting in the Z-attach brackets. I did the center five first since they were all pull rivets. I followed that up with the outboard rib because they could all be squeezed. Last I did the inboard rib because they all needed to be shot, but they were easy to do solo. The 10 grams of sealant was plenty to do all of the Z-brackets and start on the skin rivets. Here's the result:
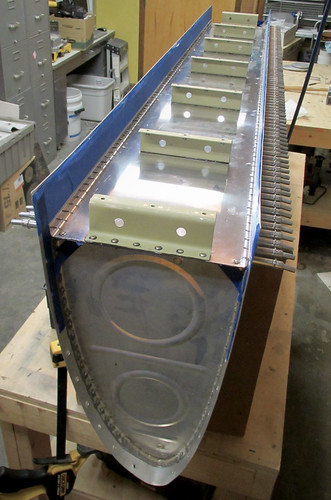
With the aft baffle and Z-brackets in place, the long process of doing all 151 skin-to-baffle rivets began. I put sealant in mine just because I want to do everything I can to prevent leaks. No idea if it was necessary, but it sure did slow everything down. Two batches of 10g sealant mixtures was plenty for all of these rivets plus reinforcing the aft corners on the inboard and outboard ribs where the plans suggest the design to be leak-prone. Here's a view of the tank with all of the rivets done except for every 10th rivet which was was not countersunk so that the clecos could act as guide pins when fitting the aft baffle:

Those clecos will be removed once the sealant has cured, then the holes countersunk and the last rivets added. I may do this after I leak-check the tank in case I need to add sealant anywhere else; 10g of sealant is going to be way overkill for just these 20 rivets.
Also in the possibly-overkill department is my treatment of the blind rivets on the aft baffle:
I don't know how reliable a sealed-end blind rivet is, and the little holes in the tops when the pull rod is removed made me nervous. So I covered the top of each one with a little blob of sealant just to be sure.
Time to set this fuel tank aside and let it cure! And that means its time to start on the right tank.
Pulled the nearly-complete left fuel tank back out of the garage now that the shop was clear of other wing parts, and worked on getting the fuel tank attach bracket riveted in. This was the first bit of fuel tank sealant work that I did solo, and it really slows things down. My advice to other builders is to have an assistant whenever you can find one for ProSeal work.
Step one was to put the part in place and mask off all of the areas I wanted to make sure didn't get ProSeal all over them. The pre-taped masking paper worked wonders in the forward end of the bay (below the bracket in the photo above). The tape also helped remind me not to apply sealant or rivets to the holes that are shared by the aft inboard tank rib which will be installed later.
Next I removed the part and cleaned it with acetone. I mixed up one 10g batch of ProSeal and applied it to the sides of the bracket as well as the aft side of the forward inboard rib flange.
The riveting was straightforward, even solo. Because it is the open end of the fuel tank, the reaches aren't terribly awkward and good control of the rivet gun was relatively straightforward. The initial 10g of ProSeal covered the mating surfaces and the caps for all 20 rivet shop heads. I mixed up a second 10g batch to cover a few small pinholes I had discovered elsewhere in the fuel tank sealant joints and to do the fillets around the edges of the tank attach bracket. The underside is a trick because the fillet has to be done blind. This meant just using a (gloved) finger with a big blob of sealant on it to smear it in there. Luckily, no one will ever see that.
With that done I did a thorough inspection of all sealed surfaces and fillets with a mirror-on-a-stick and a flashlight and discovered a number of additional cracks and pinholes that I wasn't happy with so I decided to make a third 10g batch of sealant to fill them. I used the excess to do a second go on the underside fillets of the tank attach bracket since it was difficult to do any meaningful spot touch-ups there. It's a mess under there now, and there's way more sealant there than ideal... but it probably won't have any problems with leaks and that's what I care about most.
Only two major pieces of the fuel tank body left, the aft inboard tank rib and the aft baffle. The rib is the next part but it will take some prep because it needs to have all the fuel sensors attached to it first.
16 Sep 2012
My parents were in town for the weekend so my dad helped me get the inboard aft rib installed on the left fuel tank.
Prior to installing the rib I had to finalize the shape and position of the Princeton capacitance fuel probe. I had one that I had previously bent into position but I had had to un-bend it to get the compression fitting on. When I went to re-position the tube into its original bend positions, the tube failed and broke into two pieces. So I'm going to need to order a replacement there. My advice to anyone using these probes is to only bend them once. For RV-10 builders, you can attach the tube straight onto the rib prior to intalling it, go ahead and torque down the compression fitting, then bend it into position, and finally do the install of the rib without having to modify the bends at all. Do that, and you won't risk a repetitive stress failure of the aluminum like I did. Also, you'll save yourself $200, like I didn't.
Anyway, the bends that you'll want to put into the 24" probe with a 5" bend region at the base is to go 90° down immediately after the compression fitting. Just before the tube reaches the bottom skin, bend it back up at about 135° (see photo, below). Clock the bends such that the tight 135° bend is just forward of the aft-most stiffener in the first bay of the fuel tank. Doing this allowed my probe to pass through the aft hole in the second rib without any risk of touching the sides. I also was not at risk of the probe touching the skin stiffener, so it is only sealant-separated from the fuel tank body at the far (upper) end.
I used a small piece of plastic to hold the upper end of the probe away from the skin, then coated the whole thing with sealant to hold it in place on the skin, being careful not to plug the open end of the probe.
Here's the outside view of the inboard aft rib with the electrical connections in place:
I went ahead and put the final bends in the vent tube and connect it to the bulkhead union fitting. Both sides of the union were coated in sealant since it never needs to be adjusted again. I sealed up all the bulkhead joints on the Aircraft Extras Fuel Guardian sensor and the fuel level probe, both inside and out.
The next step will be to install the aft bulkhead which essentially completes the fuel tank, assuming no leaks. However, before I close it up I'm going to have my EAA technical advisor come by and look at it.
22 Sep 2012
I grabbed a few pieces of aluminum and brass tubing and went up to Bob's shop to use his big bandsaw and lathe today.
First up was reaming out the aileron bellcrank bushings to 0.250" inner diameter (they ship about 0.01" too small). I purchased a hand reamer bit from McMaster-Carr for just this purpose. We loaded the bushing into the rotating half of Bob's lathe and he spun the lathe slowly by hand while I cranked in the bit.
The cutting flutes on the bit weren't quite long enough to go all the way through the bushing, so I had to take out the part and reverse it. This was trivial and in relatively short order both bushings were reamed. An AN4 bolt now slides into them with no trouble at all, but there is no wiggle room between the two parts. With those done, it was time to install the right aileron bellcrank inside the main body of the right wing.
This was easy, though it was akward getting the bolt torqued down through the inspection port in the bottom skin. I couldn't easily take the bottom skin off because I had inserted the bushings into the flap hangers and they are wider than the slot in the skins. I'm going to take those bushings out before I do more aileron actuation work, but for now I was able to get the bellcrank installed through the inspection port.
23 Sep 2012
My EAA technical advisor came by last week to look inside the fuel tank before I sealed it up and he liked what he saw. He did recommend that, before I put the back on it, that I find a way to fill it up with water to test the the rivets that are already done so that if any of them need to be fixed it can be done before the aft baffle is in place. I talked this over with Bob while I was in the shop yesterday and he recommended that I just tape toilet paper to the rivet lines and use some food coloring in the water so that it will show up really easily if there is a leak. So that's exactly what I did:
It didn't take too long to get toilet paper stretched across every rivet line on the skin (I'm less worried about the rivets and accessories on the inboard and outboard ribs because I can always put more sealant on those after the fact without having to open anything up).
To support the ~240 pounds of fuel tank when it is filled with water, I took some industrial carpeting I have a spare roll of and laid it out across my two workbenches with a bunch of slack between, sort of like a larger version of the carpet wing holders on my wing cart:
I stapled the carpet down to the table tops with nine 1/2" stapes on each side. I tested that it could handle the weight by standing in the loop and doing a little jump. No problems. I had to carefully put the tank in place so that I didn't disturb the toilet paper lines, but this ended up not being difficult. Then, it was just a matter of filling up a 5 gallon bucket over and over, putting some food coloring into it, and dumping it into the tank.
That's the tank at half-capacity. The red water looks almost like Kool-Aid. Yum!
When I got to 27 gallons in the tank, the vent line filled with water and my cheesy duct tape seal on the end was starting to drip, so I started siphoning out the tank at that point. Here's as full as I got it:
Three gallons short of capacity meant that it was missing the aft-most rivets on both sides and a couple of the rivets on the fuel cap flange, but these are the easiest rivets for me to inspect and access prior to putting the aft baffle on, so I'll just give those an extra close inspection and perhaps a touch-up with ProSeal before I close up the tank.
The siphoning process took a long time, and pouring out 27 gallons of blood-red water into my lawn earned me a weird look from my neighbor... but in the end I was able to undertake this test with no mess and, more importantly, no leaks!! Whew.
Somewhere during this test was the 700th man-hour spent on the plane. And now, it's time to install the aft baffle, I guess.
28 Sep 2012
At the advice of my EAA tech advisor, I bent the fuel vent tube up behind the fuel cap flange as far as I could to add capacity to the tank.
I estimate that this 1.5cm increase in height of the tube entry probably added a gallon of usable capacity to the tank. Woot!
Next, I did a 5-hour marathon session to get the aft baffle onto the left fuel tank. I masked off the bits of the tank skin that extend aft of the aft baffle, then added a small strip of masking that went from the forward edge of the baffle flange rivet holes, aft to my existing masking. This way I can just slather on sealant on the skin where the baffle flanges will contact it, then remove the thin masking line and the aft half of the flange joint will be clear to avoid pillowing of the skin. The plans seem to be really concerned about this possibility and advise that it'll make the fuel tank difficult to mount onto the rest of the wing, so I wanted to make sure I didn't encounter any problems. Here's a picture of the masked fuel tank with all of the sealant in place (I used a 30 gram batch of sealant to set this up):
And here's a corner of the tank once the aft mask line had been removed, exposing the rivet holes:
You can also see in that photo the big blob of sealant that I put in the corner to prevent the big hole in the rib corner from leaking.
Lowering the baffle into place wasn't a problem. It took awhile to get all of the clecos into place on the skin/flange joints (the plans instruct to fill every hole). I then mixed up a fresh 10 gram batch of sealant and set about riveting in the Z-attach brackets. I did the center five first since they were all pull rivets. I followed that up with the outboard rib because they could all be squeezed. Last I did the inboard rib because they all needed to be shot, but they were easy to do solo. The 10 grams of sealant was plenty to do all of the Z-brackets and start on the skin rivets. Here's the result:
With the aft baffle and Z-brackets in place, the long process of doing all 151 skin-to-baffle rivets began. I put sealant in mine just because I want to do everything I can to prevent leaks. No idea if it was necessary, but it sure did slow everything down. Two batches of 10g sealant mixtures was plenty for all of these rivets plus reinforcing the aft corners on the inboard and outboard ribs where the plans suggest the design to be leak-prone. Here's a view of the tank with all of the rivets done except for every 10th rivet which was was not countersunk so that the clecos could act as guide pins when fitting the aft baffle:
Those clecos will be removed once the sealant has cured, then the holes countersunk and the last rivets added. I may do this after I leak-check the tank in case I need to add sealant anywhere else; 10g of sealant is going to be way overkill for just these 20 rivets.
Also in the possibly-overkill department is my treatment of the blind rivets on the aft baffle:
I don't know how reliable a sealed-end blind rivet is, and the little holes in the tops when the pull rod is removed made me nervous. So I covered the top of each one with a little blob of sealant just to be sure.
Time to set this fuel tank aside and let it cure! And that means its time to start on the right tank.
| <-- August 2012 | October 2012 --> |