| Workshop | Empennage | Wings | Fuselage | Contact |
| <-- August 2011 | October 2011 --> |
Chronological Updates, September, 2011
3 Sep 2011
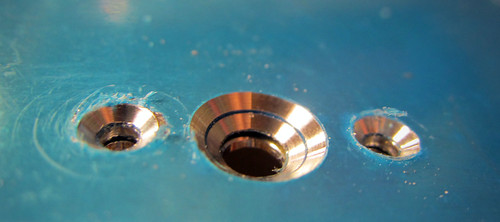
It's been a long time coming, but the fuel inlet flanges are finally conformal with the curvature of the skin.
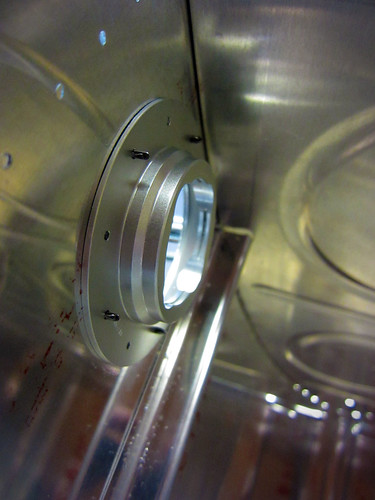
I've been using a belt sander to grind off some of the exaggerated curvatore these locking fuel caps came with, but I didn't want to go too far, so it has been a process of many iterations. Unfortunately, I didn't have a belt sander so this involved taking them in to work for about 30 seconds of work, then back home, test fit, rinse, repeat. This weekend I broke down and bought my own belt sander, which I love already, and finished the job. It still took a long time and I almost burned my thumb on hot aluminum, but they now fit beautifully.
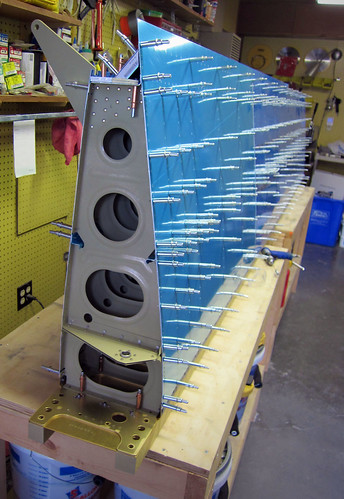
This was the only thing holding me up from disassembling the fuel tanks, which I proceeded to do immediately. I had previously drawn outlines around all of the contact surfaces on the skins so I know where to scuff prior to dimpling, and this was my first chance to see them all:
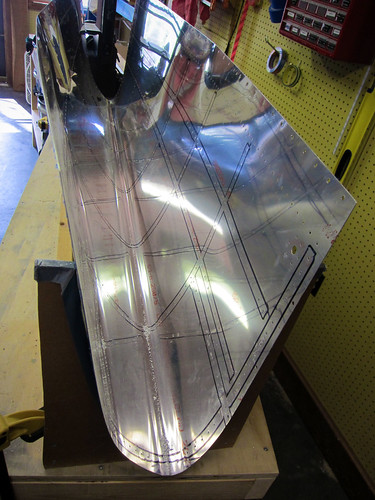
This should help keep the alclad coating intact wherever possible. The last thing I did tonight was clone the holes for the custom fuel tank accessories (fuel guardian sensor head and capacitance fuel level sender) into the inboard rib for the left tank. Having already figured out where everything should go and what size holes were needed on the right tank awhile back, this was a reasonably quick operation.
5 Sep 2011
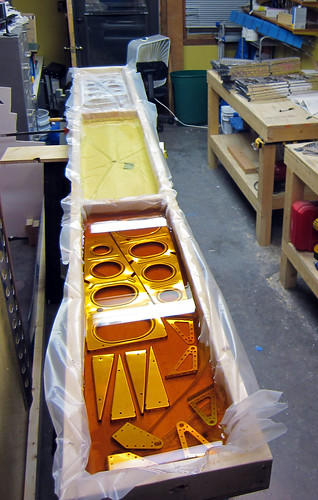
The last couple of days have seen a fair amount of work. I started by deburring all of the edges for the fuel tank ribs and wing box ribs. Then I got all of the small parts in the fuel tanks, wing box, ailerons, and left flap ready for surface chemistry.
I set the Alumiprep, Alodine, and water buckets up in the garage and started doing the small parts that would fit in the buckets. There are a lot of them, so it took a lot of time and I only got about half way through. Another evening and I should be able to have all of the small parts alodined.
11 Sep 2011
It has been an epic weekend of plane progress! On Saturday, Jeremy helped me finish off all deburring and dimpling tasks required for the next round of surface chemistry and priming. This included all of the wing ribs and fuel tank ribs as well as numerous smaller pieces.
With that, it was time to do another iteration of the Alumiprep/Alodine/Akzo chemistry fiesta. The trouble was that my dunk tank only accepts long/narrow pieces so I had to construct something that would fit the wide wing ribs in it. After a moment of considering building a new tank, I had the brainwave of just removing the center rail from my existing tank and installing some beams that go across the tank the short way, dividing it up into three 1.5 x 4 foot tanks.
Perfect. The only problem with this arrangement is that I can only fit two wing ribs in a given bay at a time, which means at least 15 cycles through the process to get all 30 wing ribs done plus additional cycles for the tank ribs, though these fit four at a time (and you can get a single tank rib in with the two wing ribs, too). Other than the fact that I had a ton of parts to run through the chemistry processes, everything went smoothly. I probably should have started earlier than 7pm on Saturday... because it took me a little over six hours to finish everything. Went to bed at 2am. Wow.
After sleeping in a few hours late, I set about priming all of the non-fueltank parts this morning. Immediately ran into a snag: the primer from the last pass had not been cleaned out of the spray gun effectively and had solidified. It was unrecoverable. So I ran to the hardware store to get a replacement spray gun, only to find that the generic one they had at half the cost of my old one was significantly better! Win. I also found that I'm just about out of my first cans of Akzo. Hard to believe that a gallon of primer has already gone into this thing. I suspect I'm using it too thick or wasting a lot. Anyway, the priming went reasonably quick. Misjudged the amount I'd need twice, so had to make three batches. Luckily, the third batch was almost exactly used up on the last parts.

For the first time, I did the priming out in the driveway because the weather was nice. This meant I didn't have to waste time turning the shop into a paint booth, fog the room with fumes, or wear a silly outfit to get the job done. Got some weird looks from joggers running by as I went to work wearing my respirator and goggles... but whatever. The sun dried the primer in just moments so the whole thing went very fast.
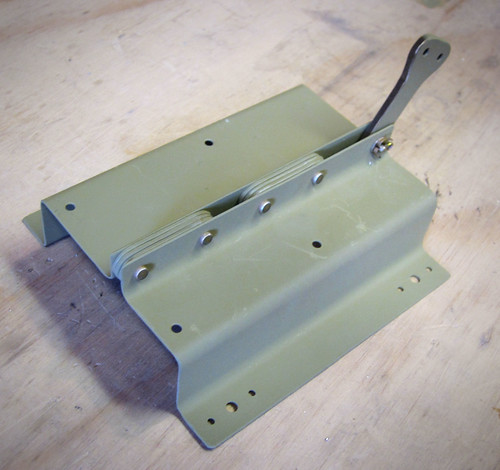
I immediately started riveting together those subsections that were now ready. First up was the aileron trim module. The housing went together quickly:
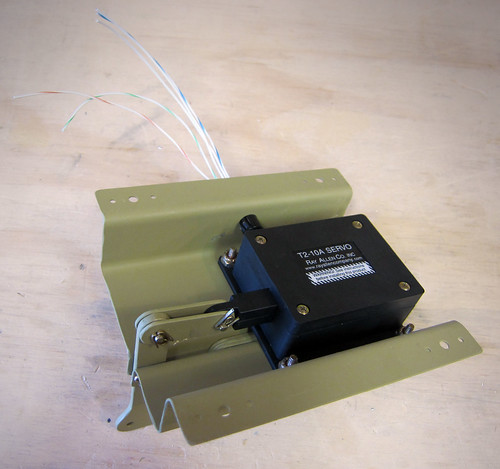
And the servo mounted into the housing:
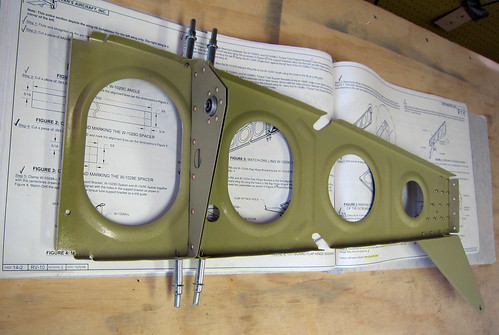
Next up were the wing ribs that had flap hangers at the aft end. This includes the inboard ribs, which also have the torque tube support bracket and bearing:
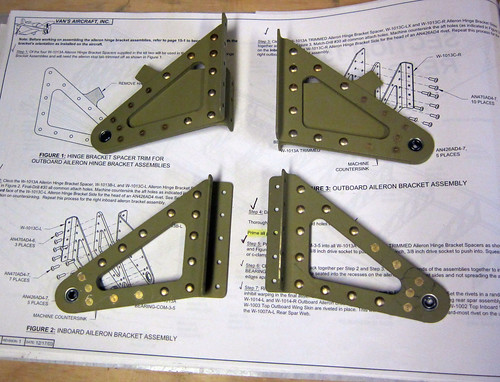
Lastly I did the aileron hanger brackets. I already knew that I had accidentally countersunk two extra holes on the inboard units; this wasn't a problem because I can just use 426 rivets in them and they'll work fine. What I didn't realize until I sat down to rivet them was that I had forgotten to countersink the outboard brackets at all. So this was done and then the parts were riveted together.
With these subassemblies done, I went through the wing plans checking for anything else that could be done out of order as get-ahead work and came up empty. So now it's time to clear the work benches and get ready for the top skin and aft spar sections! Soon, I'll have to build a rolling cart for the wings.
14 Sep 2011
With the ribs primed and their accessories riveted in place, I took some time to assemble the rest of the main wing box. I clecoed the ribs to the main spar and then attached the aft spar on top of the ribs.

The plans call for you to rivet the ribs onto the main spar before proceeding to the aft spar, but I'm not sure why. In the interest of saving some space for awhile, I'm going to go quite a ways ahead in the plans with just clecos so that I can get all of the match-drilling, deburing, and dimpling out of the way. So, after the aft spar, I went ahead and put the top skins on, then the gap fairings, then the aft skins.
The plans make a big fuss about not match-drilling this row or that because of some later part that needs to be added, but by pre-assembling all of these parts, pretty much all of the holes are now ready for drilling. Over the coming days, I'll finish all of the match drilling, deburing, and dimpling on the left wing box and then can fully disassemble it without having to store it in its bulky form. There's no real accessory work that needs to be dealth with until I've actually riveted the main spar, ribs, aft spar, and top skin sections together. But before I get there, I'll need to have done the final priming pass on the long parts. And before I do that, I'm going to get all this preparatory work done on both wing boxes as well as the flaps.
19 Sep 2011
Did a bunch of drilling on the left wing box over the last couple days. All of the holes in the top skins are now drilled (with the exception of the wing tip attach holes). I also drilled out the gap fairing to rear spar holes, which rendered both left gap fairing pieces ready for deburring. These were removed and set aside for later. All of the holes in the top skin that go through the wing walk stiffeners were countersunk as well as all of the screw holes on the inboard edge except the aft-most one, which was dimpled for #8.
So at this point all the drilling is done for the gap fairings, the top skins, the wing walk doublers, and the rear spar components. Just the bottom skin drilling remains and should go quickly as there is very little countersinking on that side. Then it'll be time to disassemble and debur everything, then do it all again on the right side.
27 Sep 2011
Finished up all of the match drilling on the left wing! Doesn't look any different, but all of the skin parts, the rear spar assembly, and the skin holes on the ribs are all ready for deburring and dimpling. I also ripped out all six of the wing access covers.

These were pretty quick, just final drilling each hole, deburring the holes and edges, then dimpling. They're all set for surface chemistry and priming on the inner surface. Time to disassemble the left wing!
It's been a long time coming, but the fuel inlet flanges are finally conformal with the curvature of the skin.
I've been using a belt sander to grind off some of the exaggerated curvatore these locking fuel caps came with, but I didn't want to go too far, so it has been a process of many iterations. Unfortunately, I didn't have a belt sander so this involved taking them in to work for about 30 seconds of work, then back home, test fit, rinse, repeat. This weekend I broke down and bought my own belt sander, which I love already, and finished the job. It still took a long time and I almost burned my thumb on hot aluminum, but they now fit beautifully.
This was the only thing holding me up from disassembling the fuel tanks, which I proceeded to do immediately. I had previously drawn outlines around all of the contact surfaces on the skins so I know where to scuff prior to dimpling, and this was my first chance to see them all:
This should help keep the alclad coating intact wherever possible. The last thing I did tonight was clone the holes for the custom fuel tank accessories (fuel guardian sensor head and capacitance fuel level sender) into the inboard rib for the left tank. Having already figured out where everything should go and what size holes were needed on the right tank awhile back, this was a reasonably quick operation.
5 Sep 2011
The last couple of days have seen a fair amount of work. I started by deburring all of the edges for the fuel tank ribs and wing box ribs. Then I got all of the small parts in the fuel tanks, wing box, ailerons, and left flap ready for surface chemistry.
I set the Alumiprep, Alodine, and water buckets up in the garage and started doing the small parts that would fit in the buckets. There are a lot of them, so it took a lot of time and I only got about half way through. Another evening and I should be able to have all of the small parts alodined.
11 Sep 2011
It has been an epic weekend of plane progress! On Saturday, Jeremy helped me finish off all deburring and dimpling tasks required for the next round of surface chemistry and priming. This included all of the wing ribs and fuel tank ribs as well as numerous smaller pieces.
With that, it was time to do another iteration of the Alumiprep/Alodine/Akzo chemistry fiesta. The trouble was that my dunk tank only accepts long/narrow pieces so I had to construct something that would fit the wide wing ribs in it. After a moment of considering building a new tank, I had the brainwave of just removing the center rail from my existing tank and installing some beams that go across the tank the short way, dividing it up into three 1.5 x 4 foot tanks.
Perfect. The only problem with this arrangement is that I can only fit two wing ribs in a given bay at a time, which means at least 15 cycles through the process to get all 30 wing ribs done plus additional cycles for the tank ribs, though these fit four at a time (and you can get a single tank rib in with the two wing ribs, too). Other than the fact that I had a ton of parts to run through the chemistry processes, everything went smoothly. I probably should have started earlier than 7pm on Saturday... because it took me a little over six hours to finish everything. Went to bed at 2am. Wow.
After sleeping in a few hours late, I set about priming all of the non-fueltank parts this morning. Immediately ran into a snag: the primer from the last pass had not been cleaned out of the spray gun effectively and had solidified. It was unrecoverable. So I ran to the hardware store to get a replacement spray gun, only to find that the generic one they had at half the cost of my old one was significantly better! Win. I also found that I'm just about out of my first cans of Akzo. Hard to believe that a gallon of primer has already gone into this thing. I suspect I'm using it too thick or wasting a lot. Anyway, the priming went reasonably quick. Misjudged the amount I'd need twice, so had to make three batches. Luckily, the third batch was almost exactly used up on the last parts.
For the first time, I did the priming out in the driveway because the weather was nice. This meant I didn't have to waste time turning the shop into a paint booth, fog the room with fumes, or wear a silly outfit to get the job done. Got some weird looks from joggers running by as I went to work wearing my respirator and goggles... but whatever. The sun dried the primer in just moments so the whole thing went very fast.
I immediately started riveting together those subsections that were now ready. First up was the aileron trim module. The housing went together quickly:
And the servo mounted into the housing:
Next up were the wing ribs that had flap hangers at the aft end. This includes the inboard ribs, which also have the torque tube support bracket and bearing:
Lastly I did the aileron hanger brackets. I already knew that I had accidentally countersunk two extra holes on the inboard units; this wasn't a problem because I can just use 426 rivets in them and they'll work fine. What I didn't realize until I sat down to rivet them was that I had forgotten to countersink the outboard brackets at all. So this was done and then the parts were riveted together.
With these subassemblies done, I went through the wing plans checking for anything else that could be done out of order as get-ahead work and came up empty. So now it's time to clear the work benches and get ready for the top skin and aft spar sections! Soon, I'll have to build a rolling cart for the wings.
14 Sep 2011
With the ribs primed and their accessories riveted in place, I took some time to assemble the rest of the main wing box. I clecoed the ribs to the main spar and then attached the aft spar on top of the ribs.
The plans call for you to rivet the ribs onto the main spar before proceeding to the aft spar, but I'm not sure why. In the interest of saving some space for awhile, I'm going to go quite a ways ahead in the plans with just clecos so that I can get all of the match-drilling, deburing, and dimpling out of the way. So, after the aft spar, I went ahead and put the top skins on, then the gap fairings, then the aft skins.
The plans make a big fuss about not match-drilling this row or that because of some later part that needs to be added, but by pre-assembling all of these parts, pretty much all of the holes are now ready for drilling. Over the coming days, I'll finish all of the match drilling, deburing, and dimpling on the left wing box and then can fully disassemble it without having to store it in its bulky form. There's no real accessory work that needs to be dealth with until I've actually riveted the main spar, ribs, aft spar, and top skin sections together. But before I get there, I'll need to have done the final priming pass on the long parts. And before I do that, I'm going to get all this preparatory work done on both wing boxes as well as the flaps.
19 Sep 2011
Did a bunch of drilling on the left wing box over the last couple days. All of the holes in the top skins are now drilled (with the exception of the wing tip attach holes). I also drilled out the gap fairing to rear spar holes, which rendered both left gap fairing pieces ready for deburring. These were removed and set aside for later. All of the holes in the top skin that go through the wing walk stiffeners were countersunk as well as all of the screw holes on the inboard edge except the aft-most one, which was dimpled for #8.
So at this point all the drilling is done for the gap fairings, the top skins, the wing walk doublers, and the rear spar components. Just the bottom skin drilling remains and should go quickly as there is very little countersinking on that side. Then it'll be time to disassemble and debur everything, then do it all again on the right side.
27 Sep 2011
Finished up all of the match drilling on the left wing! Doesn't look any different, but all of the skin parts, the rear spar assembly, and the skin holes on the ribs are all ready for deburring and dimpling. I also ripped out all six of the wing access covers.
These were pretty quick, just final drilling each hole, deburring the holes and edges, then dimpling. They're all set for surface chemistry and priming on the inner surface. Time to disassemble the left wing!
| <-- August 2011 | October 2011 --> |