| Workshop | Empennage | Wings | Fuselage | Contact |
| <-- July 2011 | September 2011 --> |
Chronological Updates, August, 2011
1 Aug 2011
Today I put some time into planning out what parts would get covered in the next two rounds of surface chemistry and priming. I have the long narrow dunk tanks that I've been using for most of the long stock, but the wing ribs won't fit in them. I'd rather not have to set up the chemicals twice in one sitting, once in the long tanks for the long pieces, and once in the wide-but-short tanks for the fat pieces. The good news is that it all works out fine. The only pieces that really need to be in the fat tanks are the ribs. The parts that need the long tanks are the aft spars, J-stiffeners, flap spars, aileron spars, main pushrods, and trailing edges. The rest of the parts are small and can be done in either tank (or even small enough that I can just dunk them in the chemical storage buckets).
The plan is to get all of the alodining for the rest of the wings done in two passes. First will be a pass with the wide tanks in preparation for completion of the wing rib chapter. It'll include all parts in the wing rib chapter and all parts of the fuel tanks except the J-stiffeners. Additionally, I'll get some of the small parts that are ready to go from the flaps, ailerons, etc. just as get-ahead work. The only work left before I'm ready for that pass is the deburring/dimpling of the fuel tank parts and finishing up the wing ribs (see below). When the first pass is complete, I'll finish up the wing rib chapter and move on to the prep work for the aft spar and top skins. The last thing I'll need to do before the last alodining pass is to get the right flap spar done. Then I can do the long dunk tank pass and move on to final assembly of the wings. At that point, the only remaining parts will be small things that can be done in the storage buckets on an as-needed basis.
So here, just for my own organizational anality, is my anticipated order of operations:

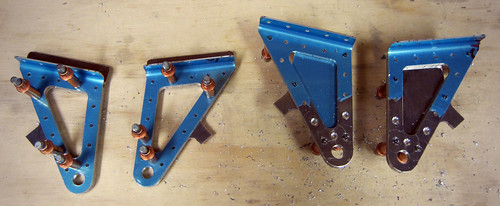
I ended up needing a larger bandsaw than I have to make the cuts for the angle pieces that support the bracket (the required width is about 1cm too big for the throat of my bandsaw), so these bracket assemblies aren't quite done. But they're very close. I also got the flap hangers done on each of the three ribs that they attach to, but didn't take any pictures of that. The exception to this was the reaming of the flap attach holes, which I'm also saving for a trip to Pat's shop because I don't have any reamer bits.
From the aft spar chapter, I went ahead and did the aileron hinge brackets as well. These were quick, but again I needed a beefier bandsaw to cut off the tabs on the outboard brackets, so they're not quite done either.
So there's not much left on the wing ribs; just a few fabrication steps that need to happen elsewhere, and a bit of follow-up once those pieces are cut. Then there's just two major steps: match-drill all the ribs to the spars, then deburr/dimple everything. I may also go ahead and figure out how much I want to drill out the wiring and plumbing holes and do so before the priming (despite the plans' doing this after priming).
8 Aug 2011
A couple small updates before I leave town for a couple weeks.
I got the angle pieces cut for the forward torque tube brackets, got them match-drilled into the ribs and brackets, and then enlarged the conduit holes using a unibit.
I noticed that the holes in my ribs are all lined up, whereas Tim Olson's seem to be offset after the first one. I like this arrangement better and hope that the straight-through 3/4" plastic conduit won't interfere with the aileron bellcrank. Eyeballing it, it seems like it should be fine.
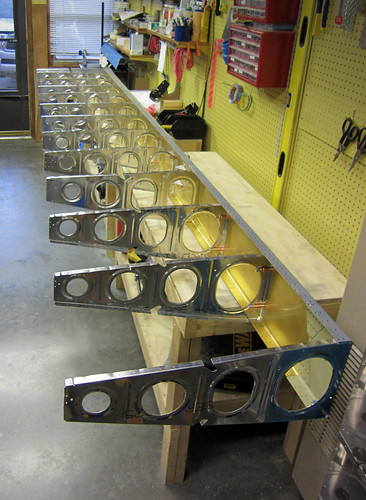
I went ahead and continued with the wing ribs chapter, attaching all of the ribs to the spars in order to match-drill the holes they share. The beginnings of a wing shape in the shop was exciting.
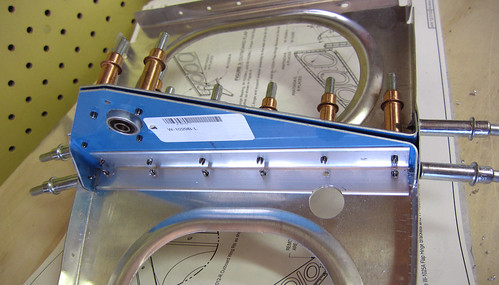
I selected a location for the Aircraft Extras Fuel Guardian sensors that I purchased last year. The nut on the sensor head fits perfectly in the anti-rotation plates used on the fuel vent fitting, so I'm going to order a couple extras to use with the Guardians. Unfortunately, making room for the anti-rotation plate limits the places I could locate the sensor. I decided to go for a relatively low position, which in turn limits the time between when the sensor will go off and when the tank will run dry.
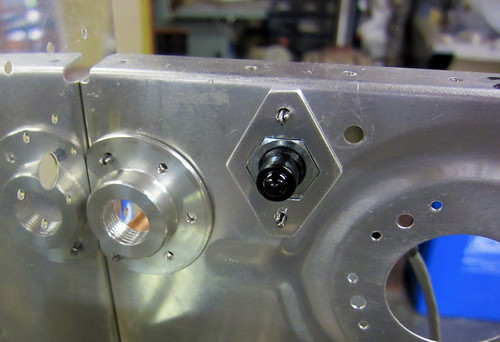
As you can see, the distance from the sensor head to the fuel intake is not much. Just a couple inches. I estimate this'll give me about a 10 minute warning on fuel. That's not a whole lot, but I'm intending for the Fuel Guardian to be a redundant backup to the EFIS' fuel level monitoring anyway, so I'm OK with that. If I'm approaching a fuel-exhaustion event, the FG light will come on and I'll have to land immediately. Or, more likely, just switch tanks (and then land).
28 Aug 2011
Back in town after a work trip. Finished off the fluting of the wing ribs, the match drilling of the wing ribs to the spars, and the deburring of the freshly-drilled holes in the spar.
I took the flap hangers up to the airport where Jeff let me use his 3/8" reamer bit to finish off the hinge holes, rendering those parts ready for surface chemistry.
Today I put some time into planning out what parts would get covered in the next two rounds of surface chemistry and priming. I have the long narrow dunk tanks that I've been using for most of the long stock, but the wing ribs won't fit in them. I'd rather not have to set up the chemicals twice in one sitting, once in the long tanks for the long pieces, and once in the wide-but-short tanks for the fat pieces. The good news is that it all works out fine. The only pieces that really need to be in the fat tanks are the ribs. The parts that need the long tanks are the aft spars, J-stiffeners, flap spars, aileron spars, main pushrods, and trailing edges. The rest of the parts are small and can be done in either tank (or even small enough that I can just dunk them in the chemical storage buckets).
The plan is to get all of the alodining for the rest of the wings done in two passes. First will be a pass with the wide tanks in preparation for completion of the wing rib chapter. It'll include all parts in the wing rib chapter and all parts of the fuel tanks except the J-stiffeners. Additionally, I'll get some of the small parts that are ready to go from the flaps, ailerons, etc. just as get-ahead work. The only work left before I'm ready for that pass is the deburring/dimpling of the fuel tank parts and finishing up the wing ribs (see below). When the first pass is complete, I'll finish up the wing rib chapter and move on to the prep work for the aft spar and top skins. The last thing I'll need to do before the last alodining pass is to get the right flap spar done. Then I can do the long dunk tank pass and move on to final assembly of the wings. At that point, the only remaining parts will be small things that can be done in the storage buckets on an as-needed basis.
So here, just for my own organizational anality, is my anticipated order of operations:
- Fuel tank accessory fit/fab
- Fuel tank dimple/deburr
- Wing ribs dimple/deburr
- First alumiprep/alodine/primer pass
- Wing rib final assembly
- Aft spar initial fit/fab/deburr/dimple
- Top skin initial fit/fab/deburr/dimple
- Gap fairing initial fit/fab/deburr/dimple
- Bottom wing skin J-stiffener initial fit/fab/deburr/dimple
- Right flap initial fit/fab/deburr/dimple
- Left flap deburr/dimple
- Second alumiprep/alodine/primer pass
- Aileron final assembly
- Flap final assembly
- Fuel tank final assembly
- Aft spar final assembly
- Top skin final assembly
- Second EAA tech counselor visit
- Build wing cart
- Attach fuel tanks and leading edges
- Aileron actuation final assembly
- Wing accessory final assembly and wiring/plumbing
- Bottom skins
I ended up needing a larger bandsaw than I have to make the cuts for the angle pieces that support the bracket (the required width is about 1cm too big for the throat of my bandsaw), so these bracket assemblies aren't quite done. But they're very close. I also got the flap hangers done on each of the three ribs that they attach to, but didn't take any pictures of that. The exception to this was the reaming of the flap attach holes, which I'm also saving for a trip to Pat's shop because I don't have any reamer bits.
From the aft spar chapter, I went ahead and did the aileron hinge brackets as well. These were quick, but again I needed a beefier bandsaw to cut off the tabs on the outboard brackets, so they're not quite done either.
So there's not much left on the wing ribs; just a few fabrication steps that need to happen elsewhere, and a bit of follow-up once those pieces are cut. Then there's just two major steps: match-drill all the ribs to the spars, then deburr/dimple everything. I may also go ahead and figure out how much I want to drill out the wiring and plumbing holes and do so before the priming (despite the plans' doing this after priming).
8 Aug 2011
A couple small updates before I leave town for a couple weeks.
I got the angle pieces cut for the forward torque tube brackets, got them match-drilled into the ribs and brackets, and then enlarged the conduit holes using a unibit.
I noticed that the holes in my ribs are all lined up, whereas Tim Olson's seem to be offset after the first one. I like this arrangement better and hope that the straight-through 3/4" plastic conduit won't interfere with the aileron bellcrank. Eyeballing it, it seems like it should be fine.
I went ahead and continued with the wing ribs chapter, attaching all of the ribs to the spars in order to match-drill the holes they share. The beginnings of a wing shape in the shop was exciting.
I selected a location for the Aircraft Extras Fuel Guardian sensors that I purchased last year. The nut on the sensor head fits perfectly in the anti-rotation plates used on the fuel vent fitting, so I'm going to order a couple extras to use with the Guardians. Unfortunately, making room for the anti-rotation plate limits the places I could locate the sensor. I decided to go for a relatively low position, which in turn limits the time between when the sensor will go off and when the tank will run dry.
As you can see, the distance from the sensor head to the fuel intake is not much. Just a couple inches. I estimate this'll give me about a 10 minute warning on fuel. That's not a whole lot, but I'm intending for the Fuel Guardian to be a redundant backup to the EFIS' fuel level monitoring anyway, so I'm OK with that. If I'm approaching a fuel-exhaustion event, the FG light will come on and I'll have to land immediately. Or, more likely, just switch tanks (and then land).
28 Aug 2011
Back in town after a work trip. Finished off the fluting of the wing ribs, the match drilling of the wing ribs to the spars, and the deburring of the freshly-drilled holes in the spar.
I took the flap hangers up to the airport where Jeff let me use his 3/8" reamer bit to finish off the hinge holes, rendering those parts ready for surface chemistry.
| <-- July 2011 | September 2011 --> |