
| Workshop | Empennage | Wings | Fuselage | Contact |
| <-- May 2010 | July 2010 --> |
Chronological Updates, June, 2010
5 Jun 2010
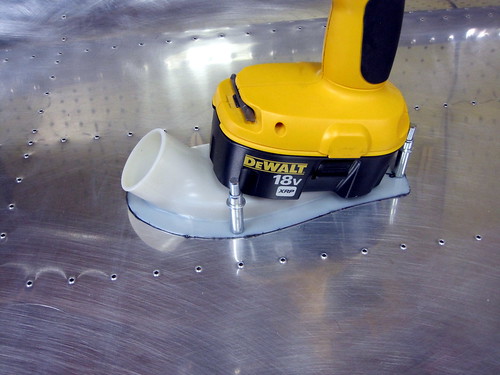
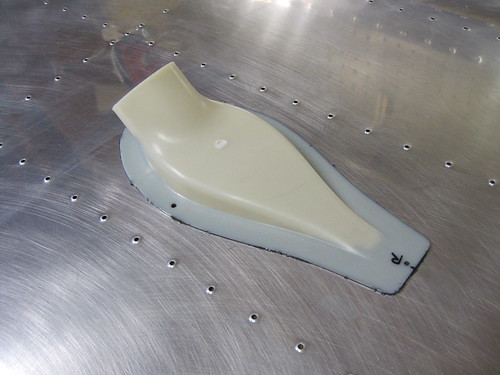
I finally got around to the small ProSeal tasks that were holding me up. This morning I scuffed and cleaned the second side skin, placed some cardboard underneath both side skins, mixed up my little tiny bottle of ProSeal, and glued on the static ports and the NACA intakes. Here is a picture of one of the NACA intakes glued and cleco'd to the side skin, with a hand drill sitting on it to add some pressure:
And here is a bad picture of one of the static ports glued in place, held down by a couple of squeezer yokes. Note that I already attached the initial right-angle fittings:
Even those these tasks only took me about an hour total, I had for some reason put them off for the last two weeks because I felt like I wouldn't have enough ProSeal or maybe that I wouldn't have enough space to do both sides at once (and I only had one little bottle of ProSeal). With the sealant curing now, and needing a few days to get fully cured up, I can't proceed with much because the skins are covering both of my workbenches.
One thing I could make forward progress on was doing the Alumiprep and Alodine treatments of the smaller tail cone parts which could be dunked in the storage buckets for the chemicals.
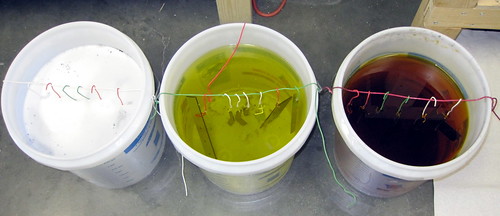
I noticed that none of the parts got nearly as "golden" as in previous Alodine sessions. I'm wondering if it has a shelf life or something that I don't know about. The parts are slightly yellowed, but nothing like what I got before. The Alumiprep is definitely still working, bubbling like crazy and lifting off all of my sharpee markings.
13 Jun 2010
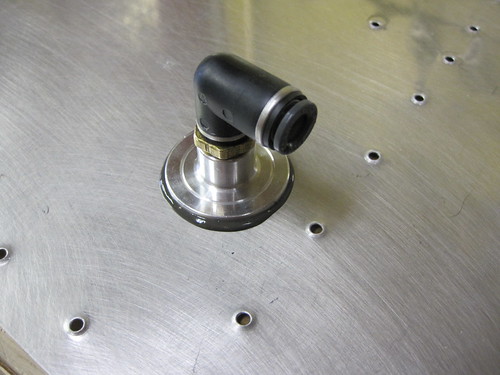
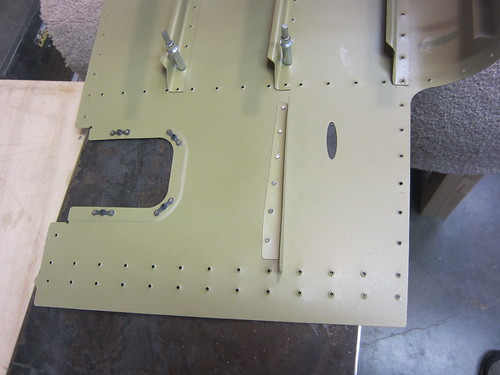
The ProSeal is done curing now. Here's what the static air ports look like:
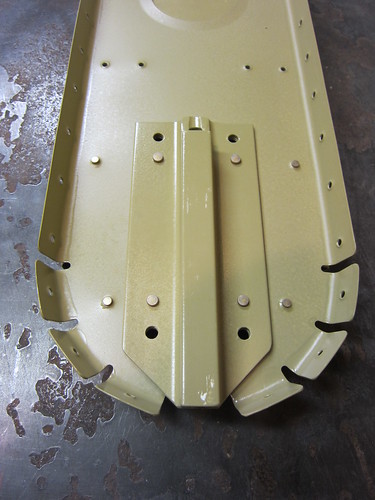
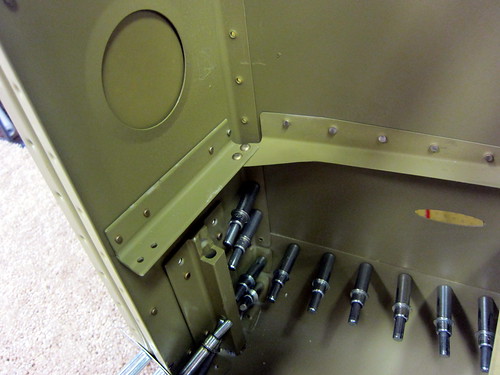
And here is what the NACA intakes look like from the inside:
With the alodining done on the grounding plate, I went ahead and riveted on some grounding tabs:
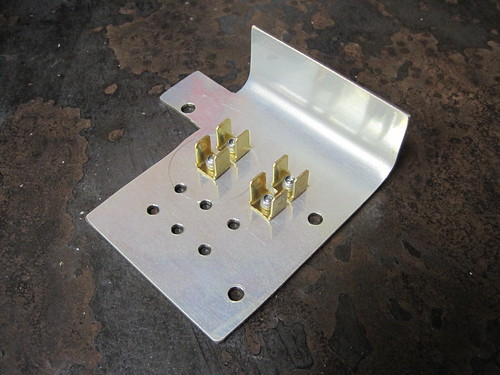
However, as you can see from this picture, the Alodine just didn't take very well. The word on the street is that my batch has just used up most of its Cromium or something, leaving it ineffective. So I went ahead and bought another gallon of Alodine and I will re-do the small parts when I do the larger parts next week. Unfortunately, my timing on ordering the Alodine was poor and it doesn't arrive until Monday, so this weekend will be spent waiting instead of working.
20 Jun 2010
Big day today! Finally had a full day in town to knock out the remaining Alumiprep, Alodine, and Akzo work that needed to be done. Spent about 12 hours today taking care of that.
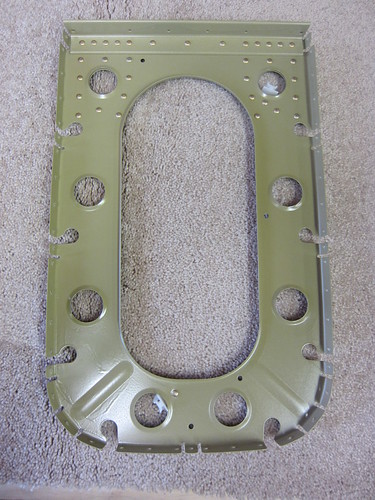
This was the first time that I needed to treat a part with Alodine that was too wide for my long thin dunk tanks. I purchased three 36" x 18" plastic bins from WalMart and used these as dunk tanks as well. The F-1007 frame halves and aft deck were still a bit too large to fit into the liquid all at once, but I was able to rotate them through to get full coverage. In the photo below, you can see one corner of the aft deck sticking out of the Alumiprep.

Other than that, everything went as usual in ChemistryLand. One small change from previous priming tasks was the need to prime strips on the outer face of some skin pieces which will eventually be overlapped by some other skin part. I taped down a strip of 18" masking paper to prevent overspray, then just primed the overlap strips like anything else:
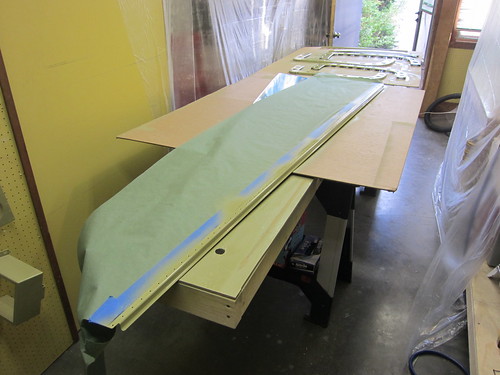
The pieces that need it are both edges of the bottom face of the bottom skin, both top edges of the side skins (I accidentally did the bottom edges as well), and the forward edge of the aft top skin.
I got a bit ahead of myself on calling it quits with the priming. I looked at this wall of done parts, didn't see anything else that needed to be done, and cleaned all my gear.
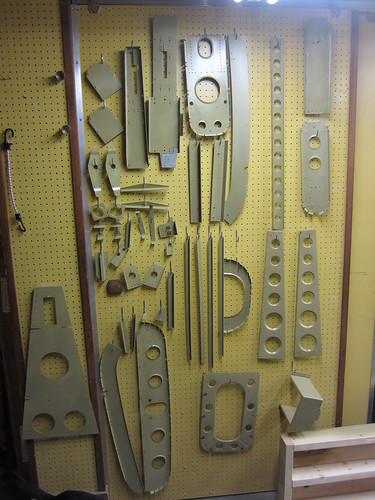
Unfortunately, there was still a small pile of small parts on the shelves behind this sliding wall which I didn't realize until the shop was cleaned, the painters tarps had been pulled down, and the excess primer had already been dumped. Boo. I'll have to finish off the primer tomorrow.
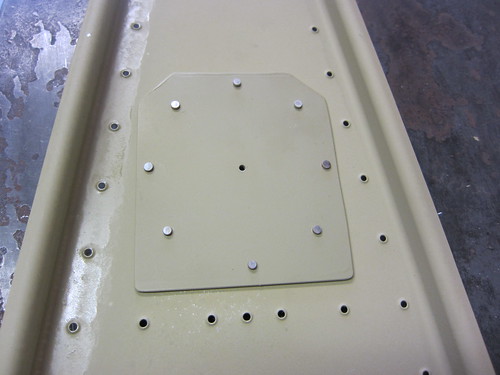
I wanted to do some riveting, but the very first riveting step (the elevator bellcrank assembly) needed parts that weren't primed yet. So I skipped ahead a bit and did what I could. I started with the battery tray. As per the instructions, I added a bunch of nutplates. I also riveted on the custom grounding plate (I had masked off the contact area so that neither piece had primer there).

The battery tray includes two custom nutplates for my battery box and is missing the two nutplates for the stock hold-down bolts (which I will not be using).
Did a bit of work on the aft two bulkheads, doing what I could without the unprimed parts. Got the lower stiffener and a wire tie anchor for the rudder wiring bundle installed in the F-1010 bulkhead:

I also got the F-1011 and F-1012 bulkheads and the tie-down block riveted together:
That's where I called it a night. Hopefully soon I'll get the rest of the small parts primed so that the riveting work can begin in earnest.
22 Jun 2010
Yesterday after work I finished of a quick batch of priming for those small parts I forgot to do on Sunday. Then I set about with the riveting. Got the elevator bellcrank done and bolted the bellcrank assembly down to the battery tray and marked all of the bolts with torque seal. I did all of the riveting on the elevator trim bracket, but ran into problems of missing cotter pins and a tight bellcrank when assembling the mechanical pieces. I'll come back to this later.
Then I finished off the F-1012 and F-1011 bulkheads that I had started last time, since their missing small parts were now primed and ready to install. I also finished the F-1010 bulkhead and added its two lightening hole wire tie anchors. The lower one marks the aft end of the bottom tail cone conduit run, and the upper one is where the VS cable bundle and elevator trim cable bundles will pass through on their way down to the conduit.
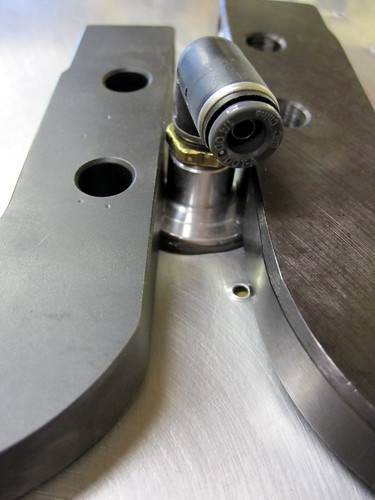
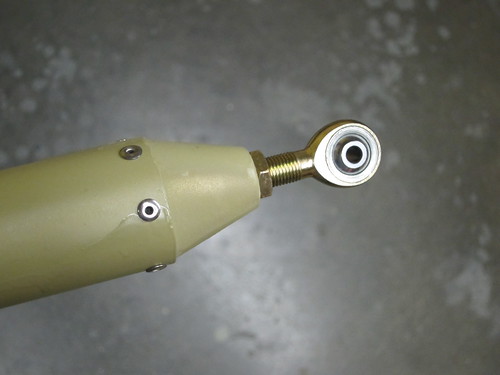
I then took care of the F-1007 and F-1008 frames and their conduit anchors as well. I pop riveted the threaded inserts into the ends of the pushrod and threaded the bearings into the ends, rendering this subassembly complete.
Tonight, I started by back-riveting in the doubler for the NAV antenna beneath the horizontal stabilizer. I won't be populating this antenna initially, so this is just a stand-in for later (hence the tiny central guide hole).
Next I added the elevator horn access panel nut plates and the rudder stop skin stiffener to the aft end of the left-side skin. The nutplates were squeezed and the stiffener was back-riveted.
I'm trying to back-rivet as much as I can on the tail cone because a) I can do it myself and b) it is much less error-prone than using the bucking bar. As such, there will be some slight departures from the plans in terms of riveting order in order to maximize the amount of the piece that I can back-rivet.
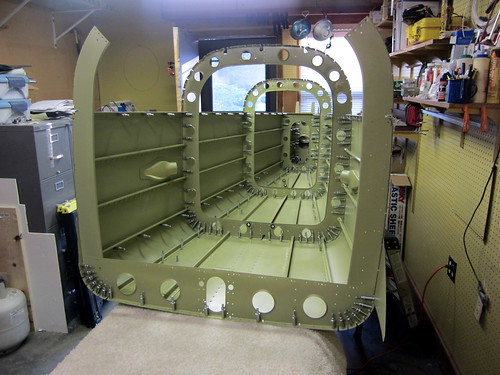
I re-assembled the entire tail cone minus the right skin and top-side bits, making sure to put all of the clecos on the left and bottom skins on the inside of the piece. This allows me to lay the tail cone on its bottom or left sides on carpet strips on top of my workbenches and have a small section exposed to the back rivet plate. I should be able to get pretty much all of the skin holes with the back rivet set this way. Once the bottom and left side are done, I'll put the right side skin on and do it up.
As I go I'll try to point out here anywhere where I'm not able to use the back rivet set (or the squeezer); I'm guessing it will be a significant minority of the rivets.
27 Jun 2010
Did a lot of work this weekend getting rivets banged out on the tail cone. I'm still working on the skin stiffeners, most of which can be back-riveted, but I'm almost done. Both -F and the -G stiffeners on the bottom skin are done. The -C, -D, and -E stiffeners on the left side are done—I did these with the right-side skin off so that I could reach the aft-most rivets with my rivet gun. The only ones I couldn't do with the back rivet set were the rivets immediately aft of the F-1010 bulkhead, which the standard back-rivet set couldn't reach becaues the bulkhead interfered.
While the right-side skin was still off, I went ahead and squeezed the two AN470 rivets that attach the left-side rudder stop skin stiffener to the rudder stop itself. These are in a really tight space and it will be a pain to get the other two once both skins are in place. But half the pain-in-the-butt work is a win in my book.
With that, I hauled the second skin piece out of the garage and attached its rudder stop skin stiffener and the four nutplates for the access plate. The nutplate rivets were all squeezed; the stiffener was back-riveted.
After clecoing the right-side skin onto the existing frame, I started on back-riveting the stiffener rivets on this side. Got two of the three done before calling it a night tonight. It's slow going doing this in sets of 10 rivets at a time by myself, but the finish quality is excellent. I did manage to get one small smiley in the left skin, but it is tucked up under the horizontal stabilizer where I won't have to look at it much. (I got it when I tried bucking one of the un-back-rivetable rivets myself, of course)
The key for me here was making sure that the piece was sitting flat on the riveting plate. I screwed this up several times, resulting in groups of 2-7 rivets that were proud and had to be drilled out and replaced with oops rivets. By the time I got to the right side, however, I seem to have figured it out. I'd estimate there are probably 20 oops rivets on the left side skin (so far!), whereas in the two stiffeners I've done on the right side so far, there is only one oops rivet.
One more stiffener on the right side to do, then I start work on the frames and bulkheads. I'll start at the big end, working down from the top as the plans recommend. I'll need bucking assistance for the F-1011 and F-1012 bulkheads. I imagine I can get to that point in one more long evening of riveting, if one presents itself.
I finally got around to the small ProSeal tasks that were holding me up. This morning I scuffed and cleaned the second side skin, placed some cardboard underneath both side skins, mixed up my little tiny bottle of ProSeal, and glued on the static ports and the NACA intakes. Here is a picture of one of the NACA intakes glued and cleco'd to the side skin, with a hand drill sitting on it to add some pressure:
And here is a bad picture of one of the static ports glued in place, held down by a couple of squeezer yokes. Note that I already attached the initial right-angle fittings:
Even those these tasks only took me about an hour total, I had for some reason put them off for the last two weeks because I felt like I wouldn't have enough ProSeal or maybe that I wouldn't have enough space to do both sides at once (and I only had one little bottle of ProSeal). With the sealant curing now, and needing a few days to get fully cured up, I can't proceed with much because the skins are covering both of my workbenches.
One thing I could make forward progress on was doing the Alumiprep and Alodine treatments of the smaller tail cone parts which could be dunked in the storage buckets for the chemicals.
I noticed that none of the parts got nearly as "golden" as in previous Alodine sessions. I'm wondering if it has a shelf life or something that I don't know about. The parts are slightly yellowed, but nothing like what I got before. The Alumiprep is definitely still working, bubbling like crazy and lifting off all of my sharpee markings.
13 Jun 2010
The ProSeal is done curing now. Here's what the static air ports look like:
And here is what the NACA intakes look like from the inside:
With the alodining done on the grounding plate, I went ahead and riveted on some grounding tabs:
However, as you can see from this picture, the Alodine just didn't take very well. The word on the street is that my batch has just used up most of its Cromium or something, leaving it ineffective. So I went ahead and bought another gallon of Alodine and I will re-do the small parts when I do the larger parts next week. Unfortunately, my timing on ordering the Alodine was poor and it doesn't arrive until Monday, so this weekend will be spent waiting instead of working.
20 Jun 2010
Big day today! Finally had a full day in town to knock out the remaining Alumiprep, Alodine, and Akzo work that needed to be done. Spent about 12 hours today taking care of that.
This was the first time that I needed to treat a part with Alodine that was too wide for my long thin dunk tanks. I purchased three 36" x 18" plastic bins from WalMart and used these as dunk tanks as well. The F-1007 frame halves and aft deck were still a bit too large to fit into the liquid all at once, but I was able to rotate them through to get full coverage. In the photo below, you can see one corner of the aft deck sticking out of the Alumiprep.
Other than that, everything went as usual in ChemistryLand. One small change from previous priming tasks was the need to prime strips on the outer face of some skin pieces which will eventually be overlapped by some other skin part. I taped down a strip of 18" masking paper to prevent overspray, then just primed the overlap strips like anything else:
The pieces that need it are both edges of the bottom face of the bottom skin, both top edges of the side skins (I accidentally did the bottom edges as well), and the forward edge of the aft top skin.
I got a bit ahead of myself on calling it quits with the priming. I looked at this wall of done parts, didn't see anything else that needed to be done, and cleaned all my gear.
Unfortunately, there was still a small pile of small parts on the shelves behind this sliding wall which I didn't realize until the shop was cleaned, the painters tarps had been pulled down, and the excess primer had already been dumped. Boo. I'll have to finish off the primer tomorrow.
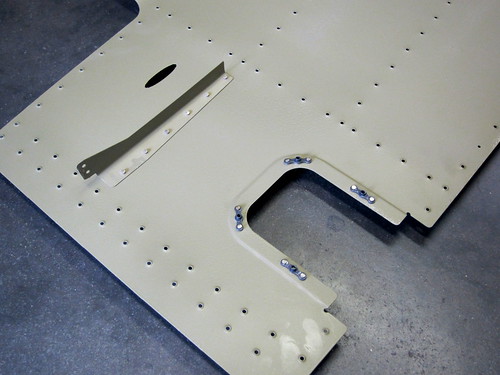
I wanted to do some riveting, but the very first riveting step (the elevator bellcrank assembly) needed parts that weren't primed yet. So I skipped ahead a bit and did what I could. I started with the battery tray. As per the instructions, I added a bunch of nutplates. I also riveted on the custom grounding plate (I had masked off the contact area so that neither piece had primer there).
The battery tray includes two custom nutplates for my battery box and is missing the two nutplates for the stock hold-down bolts (which I will not be using).
Did a bit of work on the aft two bulkheads, doing what I could without the unprimed parts. Got the lower stiffener and a wire tie anchor for the rudder wiring bundle installed in the F-1010 bulkhead:
I also got the F-1011 and F-1012 bulkheads and the tie-down block riveted together:
That's where I called it a night. Hopefully soon I'll get the rest of the small parts primed so that the riveting work can begin in earnest.
22 Jun 2010
Yesterday after work I finished of a quick batch of priming for those small parts I forgot to do on Sunday. Then I set about with the riveting. Got the elevator bellcrank done and bolted the bellcrank assembly down to the battery tray and marked all of the bolts with torque seal. I did all of the riveting on the elevator trim bracket, but ran into problems of missing cotter pins and a tight bellcrank when assembling the mechanical pieces. I'll come back to this later.
Then I finished off the F-1012 and F-1011 bulkheads that I had started last time, since their missing small parts were now primed and ready to install. I also finished the F-1010 bulkhead and added its two lightening hole wire tie anchors. The lower one marks the aft end of the bottom tail cone conduit run, and the upper one is where the VS cable bundle and elevator trim cable bundles will pass through on their way down to the conduit.
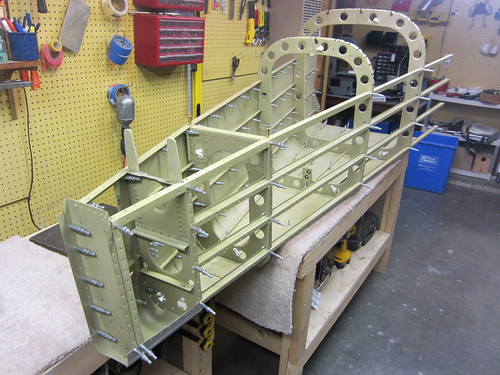
I then took care of the F-1007 and F-1008 frames and their conduit anchors as well. I pop riveted the threaded inserts into the ends of the pushrod and threaded the bearings into the ends, rendering this subassembly complete.
Tonight, I started by back-riveting in the doubler for the NAV antenna beneath the horizontal stabilizer. I won't be populating this antenna initially, so this is just a stand-in for later (hence the tiny central guide hole).
Next I added the elevator horn access panel nut plates and the rudder stop skin stiffener to the aft end of the left-side skin. The nutplates were squeezed and the stiffener was back-riveted.
I'm trying to back-rivet as much as I can on the tail cone because a) I can do it myself and b) it is much less error-prone than using the bucking bar. As such, there will be some slight departures from the plans in terms of riveting order in order to maximize the amount of the piece that I can back-rivet.
I re-assembled the entire tail cone minus the right skin and top-side bits, making sure to put all of the clecos on the left and bottom skins on the inside of the piece. This allows me to lay the tail cone on its bottom or left sides on carpet strips on top of my workbenches and have a small section exposed to the back rivet plate. I should be able to get pretty much all of the skin holes with the back rivet set this way. Once the bottom and left side are done, I'll put the right side skin on and do it up.
As I go I'll try to point out here anywhere where I'm not able to use the back rivet set (or the squeezer); I'm guessing it will be a significant minority of the rivets.
27 Jun 2010
Did a lot of work this weekend getting rivets banged out on the tail cone. I'm still working on the skin stiffeners, most of which can be back-riveted, but I'm almost done. Both -F and the -G stiffeners on the bottom skin are done. The -C, -D, and -E stiffeners on the left side are done—I did these with the right-side skin off so that I could reach the aft-most rivets with my rivet gun. The only ones I couldn't do with the back rivet set were the rivets immediately aft of the F-1010 bulkhead, which the standard back-rivet set couldn't reach becaues the bulkhead interfered.
While the right-side skin was still off, I went ahead and squeezed the two AN470 rivets that attach the left-side rudder stop skin stiffener to the rudder stop itself. These are in a really tight space and it will be a pain to get the other two once both skins are in place. But half the pain-in-the-butt work is a win in my book.
With that, I hauled the second skin piece out of the garage and attached its rudder stop skin stiffener and the four nutplates for the access plate. The nutplate rivets were all squeezed; the stiffener was back-riveted.
After clecoing the right-side skin onto the existing frame, I started on back-riveting the stiffener rivets on this side. Got two of the three done before calling it a night tonight. It's slow going doing this in sets of 10 rivets at a time by myself, but the finish quality is excellent. I did manage to get one small smiley in the left skin, but it is tucked up under the horizontal stabilizer where I won't have to look at it much. (I got it when I tried bucking one of the un-back-rivetable rivets myself, of course)
The key for me here was making sure that the piece was sitting flat on the riveting plate. I screwed this up several times, resulting in groups of 2-7 rivets that were proud and had to be drilled out and replaced with oops rivets. By the time I got to the right side, however, I seem to have figured it out. I'd estimate there are probably 20 oops rivets on the left side skin (so far!), whereas in the two stiffeners I've done on the right side so far, there is only one oops rivet.
One more stiffener on the right side to do, then I start work on the frames and bulkheads. I'll start at the big end, working down from the top as the plans recommend. I'll need bucking assistance for the F-1011 and F-1012 bulkheads. I imagine I can get to that point in one more long evening of riveting, if one presents itself.
| <-- May 2010 | July 2010 --> |