
| Workshop | Empennage | Wings | Fuselage | Contact |
| <-- April 2013 | June 2013 --> |
Chronological Updates, May, 2013
11 May 2013
While waiting for the sealant on the third leak in the left fuel tank to dry, I took a look at the fuel drain fitting. Here it is in its natural state:
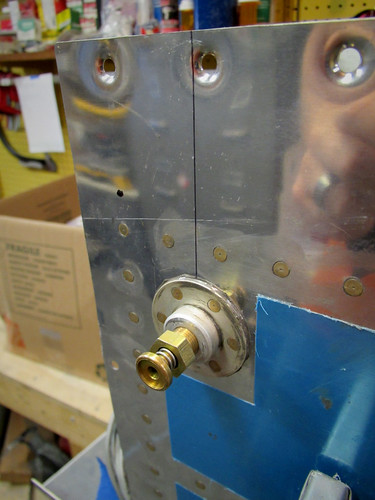
It sticks out about 1.5" from the bottom skin and strikes me as unsightly, so I got a pair of drain fitting fairings from Aircraft Extras. Here's a picture of one in place:
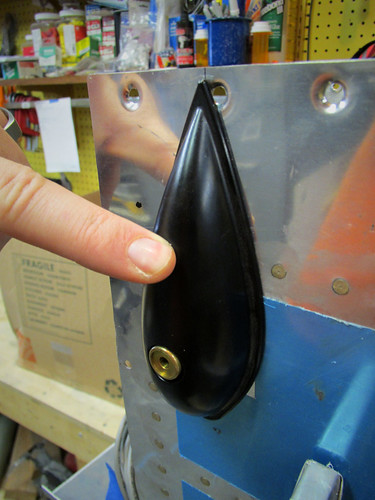
It does a good job of covering up the drain fitting in a aerodynamic and visually more-pleasant way. The training point of it does cover up one of the tank attachment screw holes slightly, but this can be ameliorated by trimming the fairing flange a bit. The real problem with this fairing is that there is very little clearance between the drain flange and the fairing, meaning that there is no way to adjust or inspect the drain fitting once the fairing is installed. The only way to install the fairing is to seal it onto the skin with something like ProSeal. Any need to inspect or adjust the fitting (e.g. if it begins to leak) will require prying the fairing off. So the question becomes, when do I paint? My intuition tells me to paint the tank skin and fairing separately before attaching the fairing, then seal the fairing in place and touch up the sealant joint with some paint. I'm hoping to find examples of other builders who have used these but so far have come up blank.
Once the sealant leak #3 had dried I re-pressurized the tank and... I suppose I shouldn't be surprised...
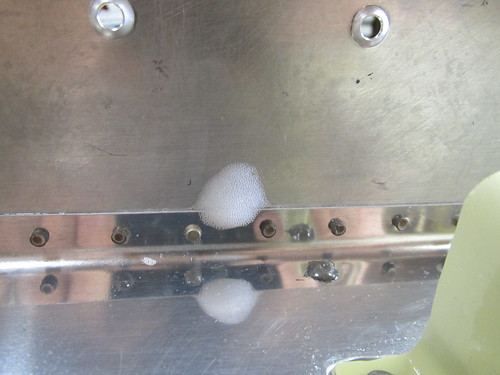
Leak #4. This one is extremely slow. I am getting pretty tired of sealing these damn things. I was trying to figure out why I only ever see one leak at a time, and then, having sealed it, a new one opens up. My best guess is that these pinhole leaks have thin membranes of sealant covering them, and when I pump the tank up I get enough pressure to burst the weakest one and then it acts as a pressure relief valve, preventing the other weak points from becoming apparent. Not sure. But I think if I find another leak next time around I'm just going to mix up a bunch of sealant and put a bead along this whole joint and hopefully be done with it forever.
Time to wait for another couple weeks for the new sealant to dry...
31 May 2013
So I let leak #4 sit with fresh sealant on it for a couple weeks and re-pressurized the tank. I should probably just cut and paste an old entry here, because predictably this happened:

So I've had enough of spot-fixing these leaks. I have no idea why there are so many. So I just said F it and mixed up 10 grams of ProSeal and put a fillet along the entire joint between the skin and baffle. I probably should have done this a few leaks ago, but here it is.
I'm going to let that sit for a long time since I'm off to Alaska for a couple weeks before this will cure. This of course means that the June progress on the RV-10 will be somewhat sparse... but I'm sure you used to that at this point, what with all the waiting for leak sealant to cure... Ugh.
While waiting for the sealant on the third leak in the left fuel tank to dry, I took a look at the fuel drain fitting. Here it is in its natural state:
It sticks out about 1.5" from the bottom skin and strikes me as unsightly, so I got a pair of drain fitting fairings from Aircraft Extras. Here's a picture of one in place:
It does a good job of covering up the drain fitting in a aerodynamic and visually more-pleasant way. The training point of it does cover up one of the tank attachment screw holes slightly, but this can be ameliorated by trimming the fairing flange a bit. The real problem with this fairing is that there is very little clearance between the drain flange and the fairing, meaning that there is no way to adjust or inspect the drain fitting once the fairing is installed. The only way to install the fairing is to seal it onto the skin with something like ProSeal. Any need to inspect or adjust the fitting (e.g. if it begins to leak) will require prying the fairing off. So the question becomes, when do I paint? My intuition tells me to paint the tank skin and fairing separately before attaching the fairing, then seal the fairing in place and touch up the sealant joint with some paint. I'm hoping to find examples of other builders who have used these but so far have come up blank.
Once the sealant leak #3 had dried I re-pressurized the tank and... I suppose I shouldn't be surprised...
Leak #4. This one is extremely slow. I am getting pretty tired of sealing these damn things. I was trying to figure out why I only ever see one leak at a time, and then, having sealed it, a new one opens up. My best guess is that these pinhole leaks have thin membranes of sealant covering them, and when I pump the tank up I get enough pressure to burst the weakest one and then it acts as a pressure relief valve, preventing the other weak points from becoming apparent. Not sure. But I think if I find another leak next time around I'm just going to mix up a bunch of sealant and put a bead along this whole joint and hopefully be done with it forever.
Time to wait for another couple weeks for the new sealant to dry...
31 May 2013
So I let leak #4 sit with fresh sealant on it for a couple weeks and re-pressurized the tank. I should probably just cut and paste an old entry here, because predictably this happened:
So I've had enough of spot-fixing these leaks. I have no idea why there are so many. So I just said F it and mixed up 10 grams of ProSeal and put a fillet along the entire joint between the skin and baffle. I probably should have done this a few leaks ago, but here it is.
I'm going to let that sit for a long time since I'm off to Alaska for a couple weeks before this will cure. This of course means that the June progress on the RV-10 will be somewhat sparse... but I'm sure you used to that at this point, what with all the waiting for leak sealant to cure... Ugh.
| <-- April 2013 | June 2013 --> |