
| Workshop | Empennage | Wings | Fuselage | Contact |
| <-- December 2009 | February 2010 --> |
Chronological Updates, January, 2010
1 Jan 2010
Happy new year! I spent my day off doing a marathon session to finish up the elevators.
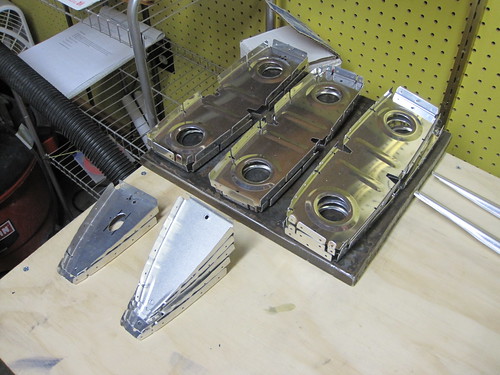
First up were the lead counterweights. For the amount of machining that goes into these particular parts, I'm really surprised that Van's doesn't mention anywhere in their plans or documentation that this is a hazardous and toxic material—particularly if you get lead dust in your lungs. So the idea of cutting into these lead bricks with a bandsaw wasn't too appealing. However, I was unable to get a hand saw to make the necessary cuts. So I got my full respirator kit on and went at it with the band saw (which made quick work of the soft metal).

When I was done with the lead cuts, I disassembled the bandsaw and vaccumed out the inside. Also vaccumed the workshop thoroughly to get all of the loose lead dust out of the way. Pain in the butt, but I feel better knowing I'm not breathing that stuff in. Just to be on the safe side, I taped up my counterweights so that I could handle them without touching the lead. The actual attachment of the counterweights to the tip ribs went without a hitch.
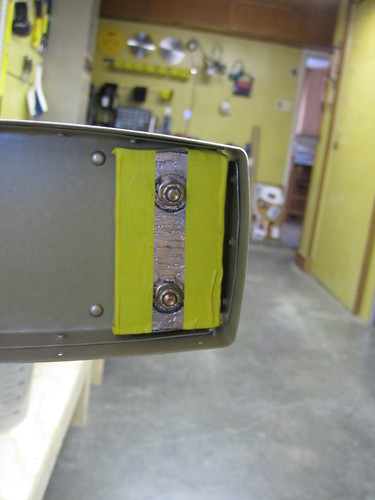
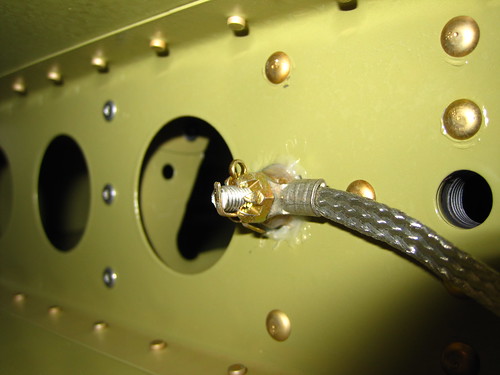
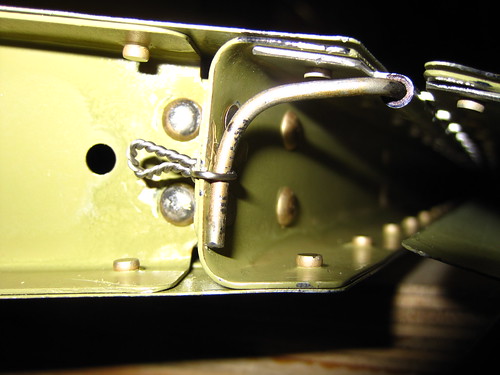
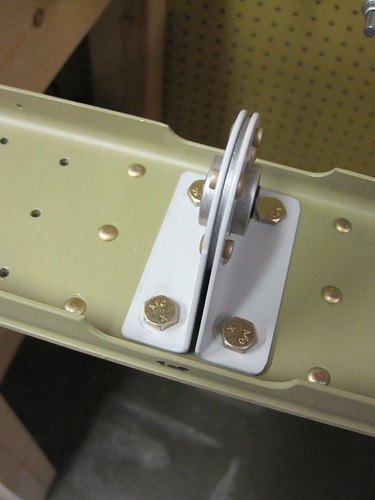
Next up was finishing the ground bonding strap attachment. This was done with the same hardware and technique I used in the rudder.
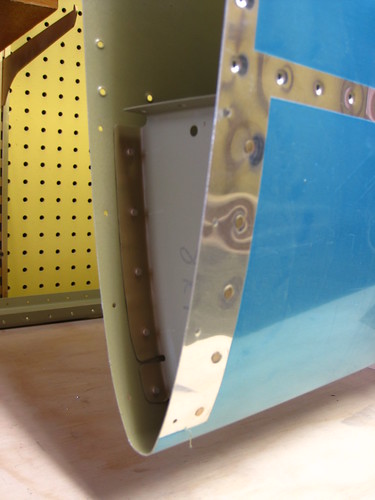
Then came the leading edge rolling and riveting. As with the rudder, this was considerably easier when I put more work into the rolling and got a tighter roll. I moved from the recommended 1.25" tube to a smaller 1" tube and found it to be slightly easier. Once the clecos are in, the riveting is a snap. Or perhaps a pop.

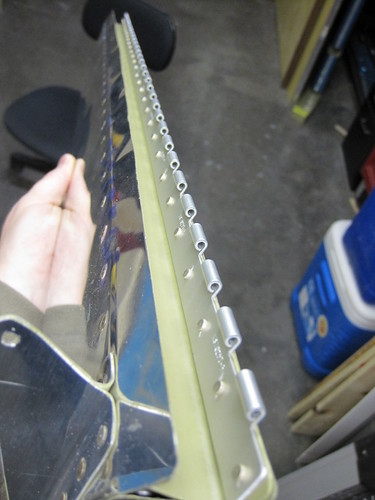
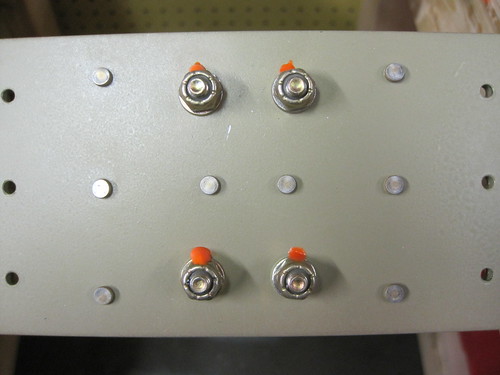
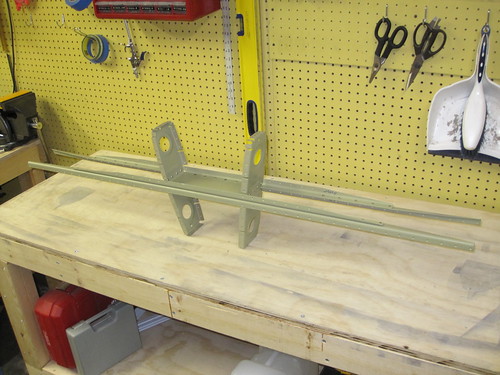
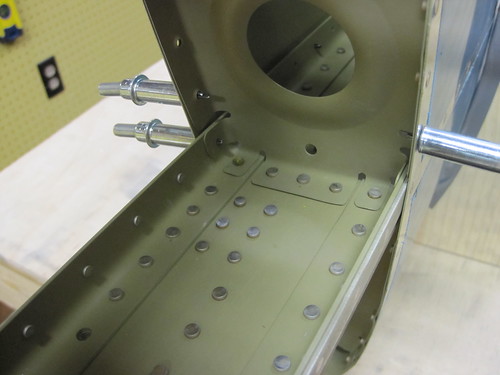
The last major task for the elevators was to attach the trim tabs via the piano hinge. This was a very straightforward task; all of the rivets are squeezable and ended up looking great. Here's the trim tab side:
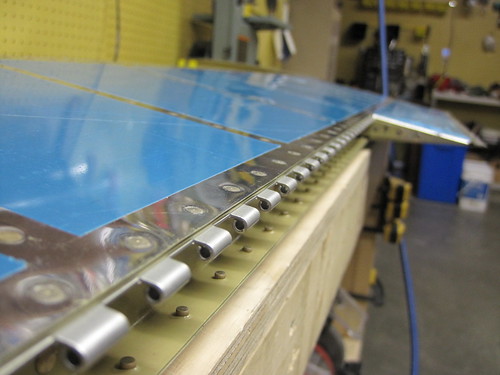
And here is the elevator side:
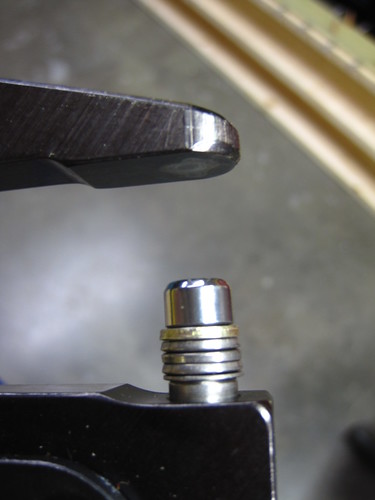
I found bending the hinge pin to be really tough; I couldn't get the tight bends shown in the plans. I ended up settling for this:
This was my first safety wire job, and I think it came out pretty well. And with that, the elevators are finished!*
*excluding fiberglass tip fairings, paint, and fixing up the static wick bolt holes.
3 Jan 2010
Quick progress on the horizontal stabilizer today and yesterday. I'm doing some things slightly out-of-order. The plans call for primer on different subassemblies at three different times. I'd like to get all of the really long parts out of the way in one pass, if possible. And really, if I can get away with it, I'd like to do all of the HS priming in one shot so that's what I'm currently going for.
However, this means that some steps have to be skipped. particularly the riveting together of the two spar assemblies. Additionally, I've decided to use the aftermarket HS-1008 brackets from iflyrv10.com, and I'm still waiting on them to arrive, so the steps involving those parts can't move forward. Luckily, the HS-1008s only attach to the forward spar assembly and don't prevent work on the rest of the HS. I did go ahead and rivet together the center hinge bearing for the rear spar assembly, since none of its components get primer anyway
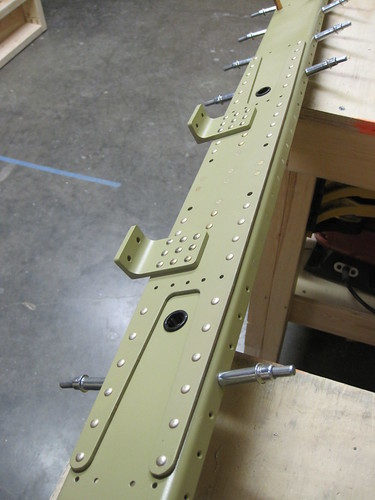
The rest of the rear spar components were quick to process and they are now ready for primer. Likewise, the forward spar goes pretty quickly. With the exception of the HS-1008 brackets, the components of this sub-assembly are ready for priming.
With the spars as far as they could go without the arrival of my additional alodine and alumiprep (I need twice as much as I have to make a deep enough pool in the dunk tank for parts this long), I started deburring the edges and lightening holes of the ribs. Using the scotchbrite wheel, this went pretty quickly. So I continued on to make the 9° bends in the inboard ribs and also to ream out the trim tab control cable hole in the inboard nose ribs.
The next step is to construct cradles for the skins, which I started yesterday but was unable to finish because I don't have a jigsaw. I went ahead and cut one of the side pieces from the empennage kit delivery crate into appropriately sized pieces and drew the rib template on them. That was it for last night.
This morning, I picked up a jigsaw from a friend and cut out the interior pieces from the cradle boards. A bit of duct tape to pad the inner surface and they were ready to go. Here's one in a test-fit:
Before populating the skin with parts, I had to match-drill the ribs into the forward spar. This was easy, but with the skins and cradles and plans sitting on my workbenches, I was really starting to run short on space.
Luckily, once the internal match-drilling is complete, everything starts to get piled together inside the skins and it takes up a lot less space. Getting clecos into the nose ribs was considerably more easy here when compared with the vertical stabilizer. Probably I just know more about what I'm doing than I did back in October, but this was really a snap.
The stringer assemblies are trivial to assemble, but be sure to put the clecos holding the two parts together on the top (longer) side, so that they don't stick down into the curvature of the HS skin. Note that this is the opposite of what is shown in the following photo. I had to reverse them or risk marring the skin.
Also, I somehow managed to insert one upside down and didn't notice until I got the skin cleco'd up all the way down half of one side. Oops... Not a big deal, just had to remove all those clecos and flip the stringer over. It is a bit unwieldy lifting the entire HS out of the cradles to pull the skins back for this operation. I'd recommend having a helper for that, though I was able to accomplish it alone.
Once the stringers are in, the skin can be cleco'd to the inspar rib flanges and then aft spar assembly can be inserted.
This is where I left it for tonight. The next step is to match drill the skins, a task that should take some time and be boring. One additional task I skipped was to match-drill the stringer web. This requires a #30 bit in a right-angle drill and I was somewhat surprised to find that my tight fit drill kit that I bought from Isham didn't include a #30 (it has a #40, the rest are standard multiples of 1/32"). I've ordered the bit from Cleaveland and will do the stringer web when it arrives.
4 Jan 2010
Split up the skin match-drilling into four segments to keep it from being too tedious. Managed to get all four segements done today. One in the morning, one at lunch, one at dinner, and one just before bed. No pictures; it doesn't look any different than it did yesterday. I'm glad this is out of the way, though it really just means that I'm one step closer to deburring all of these holes (twice, once for each side). Boo.
Progress is basically stalled right now awaiting the delivery of several items. The match drilling of the stringer web requires a drill bit that shipped overnight from Cleaveland today. The forward spar assembly requires the aftermarket HS-1008 brackets which have been on order from iflyrv10.com for over a week, but they haven't given me any indication of when they'll be arriving. How long do I wait before giving up and manufacturing my own?
I can't alodine the long parts until I get my additional alumiprep and alodine, which are scheduled to arrive on Wednesday from Aircraft Spruce. However, this is a ways off anyway since this step comes after deburring and dimpling.
18 Jan 2010
It has been a bit slow the last couple of weeks. I'm still waiting for my HS-1008 parts to ship, though Steve at iflyrv10.com assures me that they are shipping today. In the meantime, I've been getting everything ready that I can without these parts. Since my last post, I have completed all deburring on all parts, all dimpling on the nose and inspar ribs, and all countersinking of the spar and stringer flanges.
I also acquired some additional tools and supplies. Got a second gallon each of Alodine and Alumiprep, more buckets to mix them in, a bench vise (need this for some of the early operations on the tail cone), and some compressor oil (I think its about time for an oil change on this guy).
Just a few things left to do before I enter the chemistry stage of the horizontal stabilizer:
Last night I met another RV-10 builder in my home town and we got together at my place to talk about our projects, etc. He's just finishing up his vertical stabilizer, so I'm a bit farther along than he is, but its good to have a local who is familiar with the kit to bounce ideas off.
24 Jan 2010
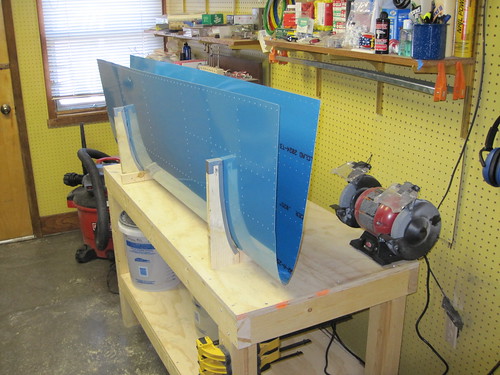
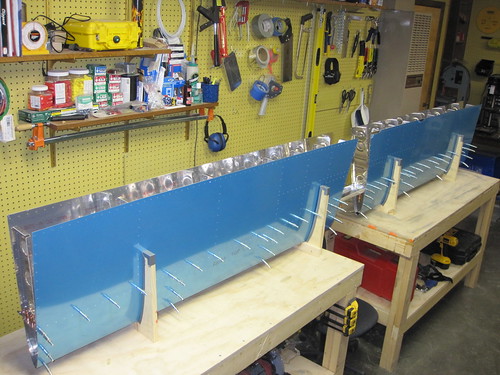
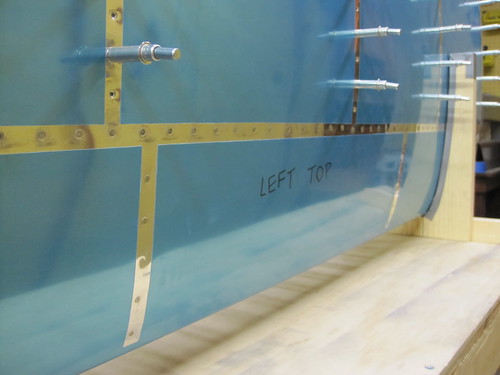
A few days ago I heard from Steve at iflyrv10.com that my parts had actually shipped and would be arriving yesterday, so I started finishing up all tasks that could be done in anticipation of some real progress yesterday and today. This included scuffing the inner surfaces of the skins so that they looked like this:
And then removing the vinyl from the rivet lines on the outer skin surfaces, leaving them looking like this:
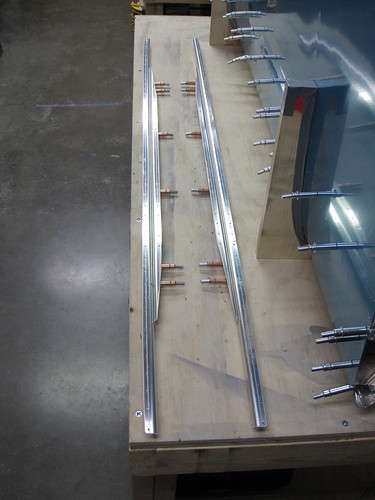
I went snowshoeing yesterday morning, and when I got back there was my package from Steve. I immediately set about match drilling the 18 holes into the HS-1008 brackets. Used a piece of angle stock to keep the brackets square during this operation.
The last thing to do before entering the chemistry phase was to dimple the skins. Due to a dinner party last night, this was put off until this morning. Nina helped me run the skins through the DRDT-2 dimpler and we knocked the skins out reasonbly quickly.
With that, all horizontal stabilizer parts were ready for alumiprep, alodine, and akzo. I spent several hours today getting all non-skin parts run through the alumiprep and alodine washes. Got to use the full 12' of my dunk tank for the spars, which was somewhat unwieldy but fun.

Had to use a big keg bucket to drain the tanks because there was more than five gallons of each solution, and I was storing them in five gallon buckets. The alodined parts look good, as always. We decided to watch a movie tonight, so the Akzo primer will have to wait for another day.
27 Jan 2010
Primed the horizontal stabilizer parts!
This has been ready to happen for a few days now, but I haven't had the time. Tonight I had nothing planned after work, so when I got home and got a quick dinner out of the way, I hung up the plastic, suited up, and primed all of the parts. It went reasonably quickly, taking about 2.5 hours for the whole routine. I used exactly 3 cups of primer (1.5 cups of each component), if you're interested. When I finished, there was just a little puddle at the very bottom of my HVLP hopper.
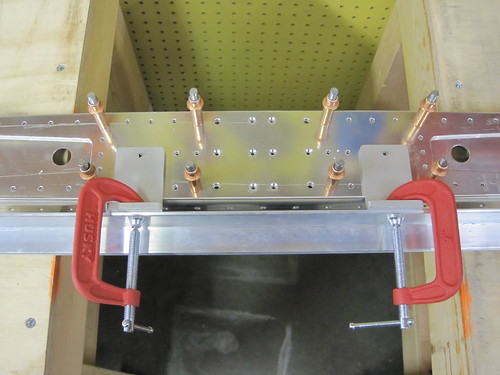
Once the primer had dried, I was anxious to start riveting because that is my favorite step. So I got right to it, beginning with the rear spar assembly. I got the rear spar doubler riveted on to the rear spar, all of the rivets were squeezed easily with the longeron set.

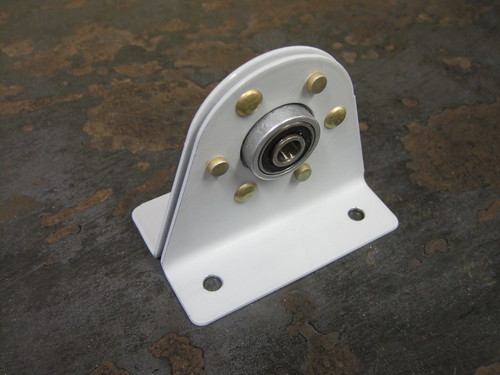
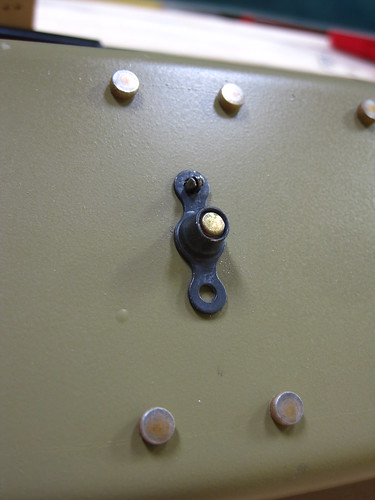
Also got all of the hinge brackets riveted in place with the squeezer:
I did not, however, get the central hinge bearing installed. This is the first component of the plane that requires bolts torqued down to a particular torque, and this the first time I've tried to use my torque wrench. Only this evening did I discover that my torque wrench has a 3/8" mandrel and my socket set is all 1/4" sockets. Time for a new socket set! I'll be heading to the hardware store over lunch tomorrow, with any luck. For now, I left the central hinge bearing off and just set the rear spar assembly aside.
Started riveting the foreward spar assembly together, including the spar doubler, the two spar caps, and the two HS-1008 brackets. Ran out of time after the AN470AD4-7 rivets and stopped for the night.
I noticed that the AN470AD4-7 rivets are so long that they required the entire longeron set travel to compress correctly. No spacer washers. This means that when I go to longer rivets (like the AD4-9 and AD4-10 rivets used in the 18 holes common to the HS-1008 brackets), I won't be able to use the squeezer and will have to resort to the gun. Boo.
28 Jan 2010
The skeleton of the horizontal stabilizer starts to take shape.
On my lunchbreak I picked up the socket I needed to torque down the AN3 bolts on the center hinge bearing. I promptly over-torqued the first bolt and totally stripped the threads on the nyloc nut. Ugh. Managed to get the other three torqued properly and marked with torque seal, but had to wait until after work to free the borked bolt and replace it. In the meantime, the aft side looked finished:
I solicited advice from some of the local EAA guys on how best to remove the stripped bolt, since turning the nut (in either direction) did nothing to either loosen or tighten the grip. Their suggestion was to put vice grips on the bolt head and pull while turning the nut with a electric drill. Didn't work at all. I ended up drilling it out.
With the offending bolt out of the way, I put in a new one (with a new nyloc) and torqued it properly, marked it, and that was that for the center elevator hinge bearing.
With that step done, I skipped ahead to riveting the stringers, stringer web, and inboard inspar rib assembly. The outer rivets connecting the two halves of each stringer can all be squeezed easily. So can the rivets that connect the inspar ribs to the stringer web. In order to use the squeezer for the rivets that connect the stringers themselves to the stringer web, you have to get a little creative. I was able to do all of the rivets on the first stringer by using a 4" thin-nosed yoke and coming at them from the far side of the stringer web. I had to use a few too many shim washers to make the spacing work out... but it seemed to work well enough.
Using the thin nose was nice, because it allowed me to get the corner rivets without any difficulty at all. The only problem is, once the second stringer is in place, the thin nose yoke is out of the question. In fact, you can't even fit the longeron yoke over the double-flange of the stringer... unless you remove both sets first. So I had to thread the yoke onto the part, then stick the sets into the holes in the yoke. This was a bit unwieldy, but allowed me to get most of the rivets in the second stringer with the squeezer. The only exceptions were the two in the corners, which I had to do with the gun.
The next step in the plans is to attach this assembly to the forward spar assembly, so I went back and finished up the rivets on the forward spar that I had skipped. The really long rivets that are used to attach the HS-1008 brackets required the gun, the rest were done with the squeezer.
I actually ran out of the AN426AD4-7 flush rivets used in the upper and lower pairs of the central rivet columns. I was two short. I had used some of these rivets back in the vertical stabilizer as oops rivets when I had accidentally countersunk some holes I wasn't supposed to. I guess I didn't have too many spares of this size. Anyway, it gave me an opportunity to use my rivet cutter for the first time, shaving down some AN426AD4-9s to fit. I wonder if I'll run short of these in the future?
The last step on the forward spar assembly was the addition of two snap bushings for the elevator trim tab control cables. I added a fillet of black RTV silicone to the aft side to keep them from vibrating loose.
With that, the forward spar assembly was complete and I could move on to the next phase which was to build up the inspar skeleton onto the aft side of the forward spar. All rivets in this section were squeezable with the longeron yoke. This went reasonably quickly and that's where I called it a night.
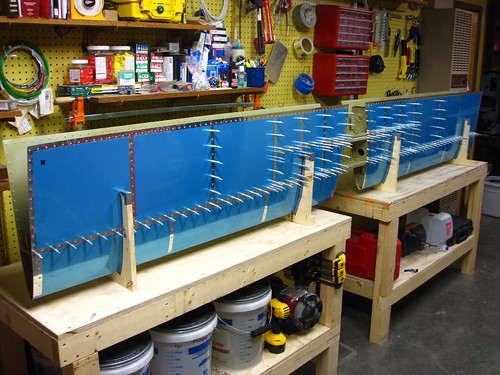
The next step is to put the skins back in the cradles and start riveting the skeleton parts into the skins. The horizontal stabilizer should be complete in reasonably short order!
31 jan 2010
On Friday before heading down to Albuquerque for the weekend, I got a bit of work done on the stabilizer. The first step was to get the skins set back up in the cradles and to cleco in the nose ribs. This wasn't difficult and went very quickly.

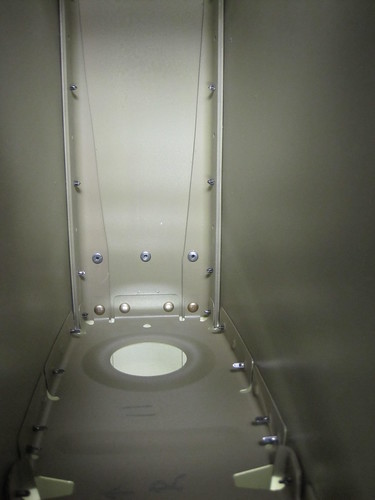
Here's an inside view:
The inboard and outboard nose ribs can be riveted with the squeezer and go very quickly. Here's a view of one of the outboard ribs all riveted in:
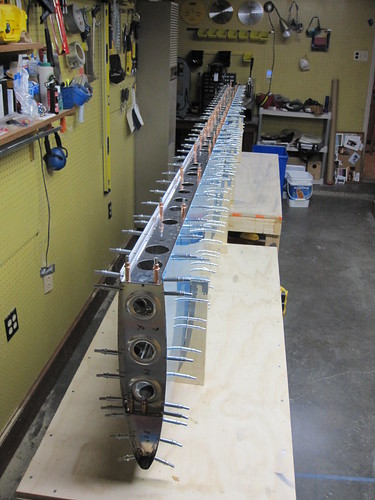
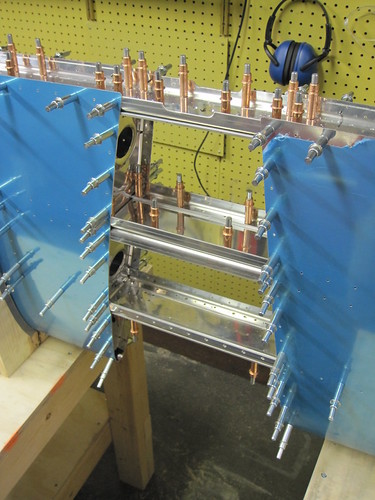
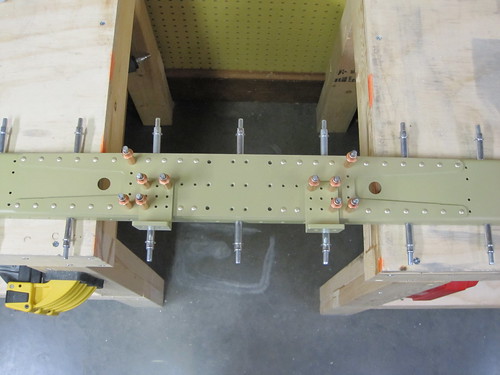
The middle nose ribs require bucking and the rivet gun. I got Bob to swing by after work and help me knock these 40 rivets out. No big deal. Once that was done, the entire forward spar and inspar rib assembly that I had riveted together earlier gets set on top of the nose ribs and everything gets cleco'd together.
That's where I left the project on Friday. When I came back into town today, I started doing all of the rivets that connect the nose ribs and forward spar. The outboard nose ribs can be squeezed and look like this:

The middle pair of nose ribs just gets LP3-4 blind rivets. Here's a view looking down on the rivet heads holding one of these nose ribs on:
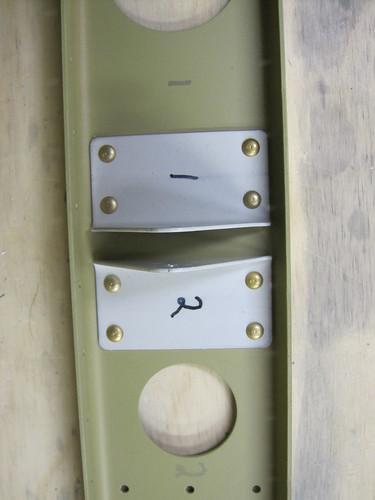
Next I cleco'd in the remaining inspar ribs and go those riveted to the forward spar. The outer ones get solid rivets, the inner ones blind rivets. At this point, the next steps required bucking and I waited for Bob to come over for that. In the meantime, I set about putting the bonding strap attachment hardware in place for the braided strap connecting the horizontal stabilizer to the elevators.
To match the connection on the elevators, I needed the attachment to be just to the outboard side of the outboard hinge. During my EAA technical counselor visit, my counselor advised me to just use AN3 bolts and anchor nuts instead of the elaborate aluminum threaded rod setup I had been using. So I'm going to try that here. I went ahead and drilled a #12 hole through the center of the hinge bracket, then put an AN3 bolt through the hole and threaded on an anchor nut. I matched drilled the holes for the anchor nut rivets through using the nut itself as the template. I made sure to cleco the first hole before drilling the second to make sure all three holes line up.
The next step was to countersink the hinge bracket for the AN426AD3 rivets, but while countersinking the first hole, I snapped the pilot tip off of my 3/32" countersink bit. The rest of this modification will have to wait on my replacement bit from Cleaveland.

Switching gears, I added the snap bushings to the aft spar and put a black RTV fillet on the forward side to keep them from vibrating loose. Having run out of things to do, I waited for Bob to show up again and then we set to work riveting.
The first thing we did were the rivets that hold the inboard ribs and forward spar together. These are in cramped quarters and cannot be squeezed. They required the long offset set for the rivet gun and were made much easier with the addition of a second person to buck.
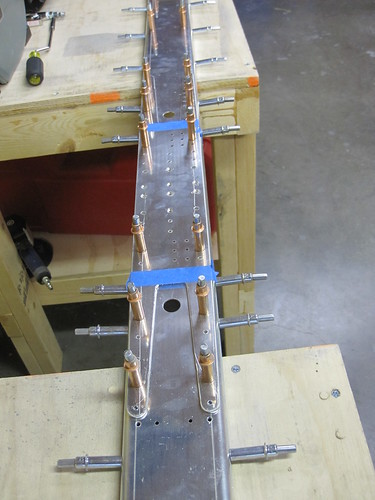
Then we set about doing the top side forward spar skin rivets. There are a lot of these, and they take a long time. It took us about two hours to do just the top side (and we didn't do any of the stringer or inspar rib rivets, just the spar).
When we were done with that one long-ass rivet line, Bob had to go so I drilled out two rivets we had borked and fixed them, then called it a night. Here's a time lapse movie I made of the activity starting with the inboard rib rivets. Thrill to the excitement of watching us rivet and eat pizza. Woo!
Good times.
Happy new year! I spent my day off doing a marathon session to finish up the elevators.
First up were the lead counterweights. For the amount of machining that goes into these particular parts, I'm really surprised that Van's doesn't mention anywhere in their plans or documentation that this is a hazardous and toxic material—particularly if you get lead dust in your lungs. So the idea of cutting into these lead bricks with a bandsaw wasn't too appealing. However, I was unable to get a hand saw to make the necessary cuts. So I got my full respirator kit on and went at it with the band saw (which made quick work of the soft metal).
When I was done with the lead cuts, I disassembled the bandsaw and vaccumed out the inside. Also vaccumed the workshop thoroughly to get all of the loose lead dust out of the way. Pain in the butt, but I feel better knowing I'm not breathing that stuff in. Just to be on the safe side, I taped up my counterweights so that I could handle them without touching the lead. The actual attachment of the counterweights to the tip ribs went without a hitch.
Next up was finishing the ground bonding strap attachment. This was done with the same hardware and technique I used in the rudder.
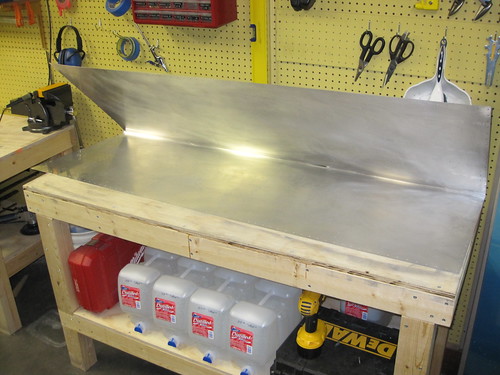
Then came the leading edge rolling and riveting. As with the rudder, this was considerably easier when I put more work into the rolling and got a tighter roll. I moved from the recommended 1.25" tube to a smaller 1" tube and found it to be slightly easier. Once the clecos are in, the riveting is a snap. Or perhaps a pop.
The last major task for the elevators was to attach the trim tabs via the piano hinge. This was a very straightforward task; all of the rivets are squeezable and ended up looking great. Here's the trim tab side:
And here is the elevator side:
I found bending the hinge pin to be really tough; I couldn't get the tight bends shown in the plans. I ended up settling for this:
This was my first safety wire job, and I think it came out pretty well. And with that, the elevators are finished!*
*excluding fiberglass tip fairings, paint, and fixing up the static wick bolt holes.
3 Jan 2010
Quick progress on the horizontal stabilizer today and yesterday. I'm doing some things slightly out-of-order. The plans call for primer on different subassemblies at three different times. I'd like to get all of the really long parts out of the way in one pass, if possible. And really, if I can get away with it, I'd like to do all of the HS priming in one shot so that's what I'm currently going for.
However, this means that some steps have to be skipped. particularly the riveting together of the two spar assemblies. Additionally, I've decided to use the aftermarket HS-1008 brackets from iflyrv10.com, and I'm still waiting on them to arrive, so the steps involving those parts can't move forward. Luckily, the HS-1008s only attach to the forward spar assembly and don't prevent work on the rest of the HS. I did go ahead and rivet together the center hinge bearing for the rear spar assembly, since none of its components get primer anyway
The rest of the rear spar components were quick to process and they are now ready for primer. Likewise, the forward spar goes pretty quickly. With the exception of the HS-1008 brackets, the components of this sub-assembly are ready for priming.
With the spars as far as they could go without the arrival of my additional alodine and alumiprep (I need twice as much as I have to make a deep enough pool in the dunk tank for parts this long), I started deburring the edges and lightening holes of the ribs. Using the scotchbrite wheel, this went pretty quickly. So I continued on to make the 9° bends in the inboard ribs and also to ream out the trim tab control cable hole in the inboard nose ribs.
The next step is to construct cradles for the skins, which I started yesterday but was unable to finish because I don't have a jigsaw. I went ahead and cut one of the side pieces from the empennage kit delivery crate into appropriately sized pieces and drew the rib template on them. That was it for last night.
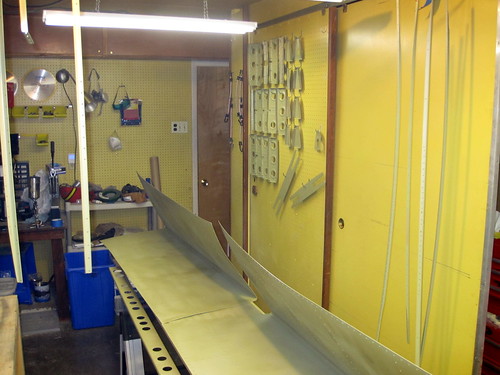
This morning, I picked up a jigsaw from a friend and cut out the interior pieces from the cradle boards. A bit of duct tape to pad the inner surface and they were ready to go. Here's one in a test-fit:
Before populating the skin with parts, I had to match-drill the ribs into the forward spar. This was easy, but with the skins and cradles and plans sitting on my workbenches, I was really starting to run short on space.
Luckily, once the internal match-drilling is complete, everything starts to get piled together inside the skins and it takes up a lot less space. Getting clecos into the nose ribs was considerably more easy here when compared with the vertical stabilizer. Probably I just know more about what I'm doing than I did back in October, but this was really a snap.
The stringer assemblies are trivial to assemble, but be sure to put the clecos holding the two parts together on the top (longer) side, so that they don't stick down into the curvature of the HS skin. Note that this is the opposite of what is shown in the following photo. I had to reverse them or risk marring the skin.
Also, I somehow managed to insert one upside down and didn't notice until I got the skin cleco'd up all the way down half of one side. Oops... Not a big deal, just had to remove all those clecos and flip the stringer over. It is a bit unwieldy lifting the entire HS out of the cradles to pull the skins back for this operation. I'd recommend having a helper for that, though I was able to accomplish it alone.
Once the stringers are in, the skin can be cleco'd to the inspar rib flanges and then aft spar assembly can be inserted.
This is where I left it for tonight. The next step is to match drill the skins, a task that should take some time and be boring. One additional task I skipped was to match-drill the stringer web. This requires a #30 bit in a right-angle drill and I was somewhat surprised to find that my tight fit drill kit that I bought from Isham didn't include a #30 (it has a #40, the rest are standard multiples of 1/32"). I've ordered the bit from Cleaveland and will do the stringer web when it arrives.
4 Jan 2010
Split up the skin match-drilling into four segments to keep it from being too tedious. Managed to get all four segements done today. One in the morning, one at lunch, one at dinner, and one just before bed. No pictures; it doesn't look any different than it did yesterday. I'm glad this is out of the way, though it really just means that I'm one step closer to deburring all of these holes (twice, once for each side). Boo.
Progress is basically stalled right now awaiting the delivery of several items. The match drilling of the stringer web requires a drill bit that shipped overnight from Cleaveland today. The forward spar assembly requires the aftermarket HS-1008 brackets which have been on order from iflyrv10.com for over a week, but they haven't given me any indication of when they'll be arriving. How long do I wait before giving up and manufacturing my own?
I can't alodine the long parts until I get my additional alumiprep and alodine, which are scheduled to arrive on Wednesday from Aircraft Spruce. However, this is a ways off anyway since this step comes after deburring and dimpling.
18 Jan 2010
It has been a bit slow the last couple of weeks. I'm still waiting for my HS-1008 parts to ship, though Steve at iflyrv10.com assures me that they are shipping today. In the meantime, I've been getting everything ready that I can without these parts. Since my last post, I have completed all deburring on all parts, all dimpling on the nose and inspar ribs, and all countersinking of the spar and stringer flanges.
I also acquired some additional tools and supplies. Got a second gallon each of Alodine and Alumiprep, more buckets to mix them in, a bench vise (need this for some of the early operations on the tail cone), and some compressor oil (I think its about time for an oil change on this guy).
Just a few things left to do before I enter the chemistry stage of the horizontal stabilizer:
- Scuff and clean the inner skin surfaces
- Remove the vinyl from the rivet lines on the outer skin surfaces
- Dimple the skins
- Match drill and deburr the HS-1008 holes.
Last night I met another RV-10 builder in my home town and we got together at my place to talk about our projects, etc. He's just finishing up his vertical stabilizer, so I'm a bit farther along than he is, but its good to have a local who is familiar with the kit to bounce ideas off.
24 Jan 2010
A few days ago I heard from Steve at iflyrv10.com that my parts had actually shipped and would be arriving yesterday, so I started finishing up all tasks that could be done in anticipation of some real progress yesterday and today. This included scuffing the inner surfaces of the skins so that they looked like this:
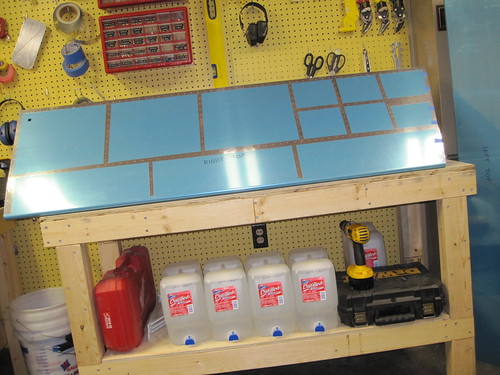
And then removing the vinyl from the rivet lines on the outer skin surfaces, leaving them looking like this:
I went snowshoeing yesterday morning, and when I got back there was my package from Steve. I immediately set about match drilling the 18 holes into the HS-1008 brackets. Used a piece of angle stock to keep the brackets square during this operation.
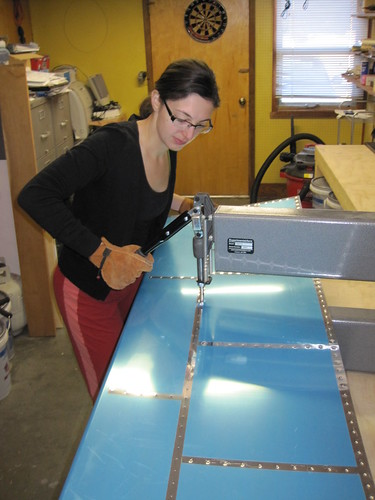
The last thing to do before entering the chemistry phase was to dimple the skins. Due to a dinner party last night, this was put off until this morning. Nina helped me run the skins through the DRDT-2 dimpler and we knocked the skins out reasonbly quickly.
With that, all horizontal stabilizer parts were ready for alumiprep, alodine, and akzo. I spent several hours today getting all non-skin parts run through the alumiprep and alodine washes. Got to use the full 12' of my dunk tank for the spars, which was somewhat unwieldy but fun.
Had to use a big keg bucket to drain the tanks because there was more than five gallons of each solution, and I was storing them in five gallon buckets. The alodined parts look good, as always. We decided to watch a movie tonight, so the Akzo primer will have to wait for another day.
27 Jan 2010
Primed the horizontal stabilizer parts!
This has been ready to happen for a few days now, but I haven't had the time. Tonight I had nothing planned after work, so when I got home and got a quick dinner out of the way, I hung up the plastic, suited up, and primed all of the parts. It went reasonably quickly, taking about 2.5 hours for the whole routine. I used exactly 3 cups of primer (1.5 cups of each component), if you're interested. When I finished, there was just a little puddle at the very bottom of my HVLP hopper.
Once the primer had dried, I was anxious to start riveting because that is my favorite step. So I got right to it, beginning with the rear spar assembly. I got the rear spar doubler riveted on to the rear spar, all of the rivets were squeezed easily with the longeron set.
Also got all of the hinge brackets riveted in place with the squeezer:
I did not, however, get the central hinge bearing installed. This is the first component of the plane that requires bolts torqued down to a particular torque, and this the first time I've tried to use my torque wrench. Only this evening did I discover that my torque wrench has a 3/8" mandrel and my socket set is all 1/4" sockets. Time for a new socket set! I'll be heading to the hardware store over lunch tomorrow, with any luck. For now, I left the central hinge bearing off and just set the rear spar assembly aside.
Started riveting the foreward spar assembly together, including the spar doubler, the two spar caps, and the two HS-1008 brackets. Ran out of time after the AN470AD4-7 rivets and stopped for the night.
I noticed that the AN470AD4-7 rivets are so long that they required the entire longeron set travel to compress correctly. No spacer washers. This means that when I go to longer rivets (like the AD4-9 and AD4-10 rivets used in the 18 holes common to the HS-1008 brackets), I won't be able to use the squeezer and will have to resort to the gun. Boo.
28 Jan 2010
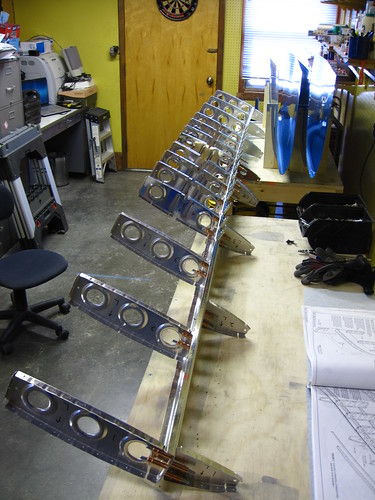
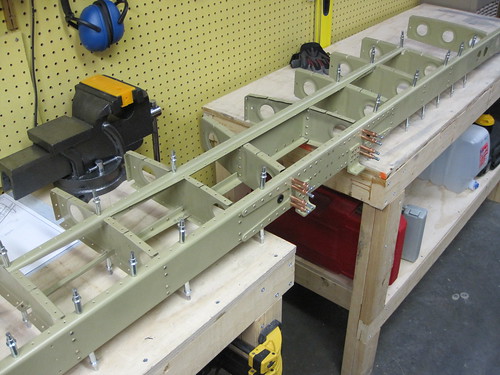
The skeleton of the horizontal stabilizer starts to take shape.
On my lunchbreak I picked up the socket I needed to torque down the AN3 bolts on the center hinge bearing. I promptly over-torqued the first bolt and totally stripped the threads on the nyloc nut. Ugh. Managed to get the other three torqued properly and marked with torque seal, but had to wait until after work to free the borked bolt and replace it. In the meantime, the aft side looked finished:
I solicited advice from some of the local EAA guys on how best to remove the stripped bolt, since turning the nut (in either direction) did nothing to either loosen or tighten the grip. Their suggestion was to put vice grips on the bolt head and pull while turning the nut with a electric drill. Didn't work at all. I ended up drilling it out.
With the offending bolt out of the way, I put in a new one (with a new nyloc) and torqued it properly, marked it, and that was that for the center elevator hinge bearing.
With that step done, I skipped ahead to riveting the stringers, stringer web, and inboard inspar rib assembly. The outer rivets connecting the two halves of each stringer can all be squeezed easily. So can the rivets that connect the inspar ribs to the stringer web. In order to use the squeezer for the rivets that connect the stringers themselves to the stringer web, you have to get a little creative. I was able to do all of the rivets on the first stringer by using a 4" thin-nosed yoke and coming at them from the far side of the stringer web. I had to use a few too many shim washers to make the spacing work out... but it seemed to work well enough.
Using the thin nose was nice, because it allowed me to get the corner rivets without any difficulty at all. The only problem is, once the second stringer is in place, the thin nose yoke is out of the question. In fact, you can't even fit the longeron yoke over the double-flange of the stringer... unless you remove both sets first. So I had to thread the yoke onto the part, then stick the sets into the holes in the yoke. This was a bit unwieldy, but allowed me to get most of the rivets in the second stringer with the squeezer. The only exceptions were the two in the corners, which I had to do with the gun.
The next step in the plans is to attach this assembly to the forward spar assembly, so I went back and finished up the rivets on the forward spar that I had skipped. The really long rivets that are used to attach the HS-1008 brackets required the gun, the rest were done with the squeezer.
I actually ran out of the AN426AD4-7 flush rivets used in the upper and lower pairs of the central rivet columns. I was two short. I had used some of these rivets back in the vertical stabilizer as oops rivets when I had accidentally countersunk some holes I wasn't supposed to. I guess I didn't have too many spares of this size. Anyway, it gave me an opportunity to use my rivet cutter for the first time, shaving down some AN426AD4-9s to fit. I wonder if I'll run short of these in the future?
The last step on the forward spar assembly was the addition of two snap bushings for the elevator trim tab control cables. I added a fillet of black RTV silicone to the aft side to keep them from vibrating loose.
With that, the forward spar assembly was complete and I could move on to the next phase which was to build up the inspar skeleton onto the aft side of the forward spar. All rivets in this section were squeezable with the longeron yoke. This went reasonably quickly and that's where I called it a night.
The next step is to put the skins back in the cradles and start riveting the skeleton parts into the skins. The horizontal stabilizer should be complete in reasonably short order!
31 jan 2010
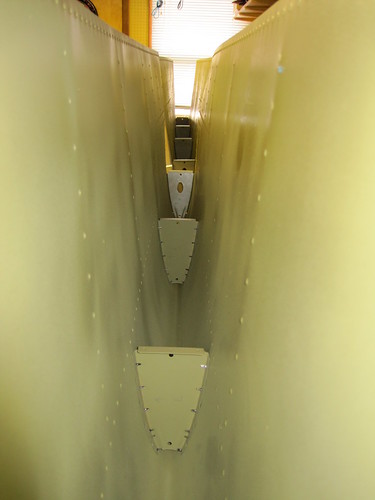
On Friday before heading down to Albuquerque for the weekend, I got a bit of work done on the stabilizer. The first step was to get the skins set back up in the cradles and to cleco in the nose ribs. This wasn't difficult and went very quickly.
Here's an inside view:
The inboard and outboard nose ribs can be riveted with the squeezer and go very quickly. Here's a view of one of the outboard ribs all riveted in:
The middle nose ribs require bucking and the rivet gun. I got Bob to swing by after work and help me knock these 40 rivets out. No big deal. Once that was done, the entire forward spar and inspar rib assembly that I had riveted together earlier gets set on top of the nose ribs and everything gets cleco'd together.
That's where I left the project on Friday. When I came back into town today, I started doing all of the rivets that connect the nose ribs and forward spar. The outboard nose ribs can be squeezed and look like this:
The middle pair of nose ribs just gets LP3-4 blind rivets. Here's a view looking down on the rivet heads holding one of these nose ribs on:
Next I cleco'd in the remaining inspar ribs and go those riveted to the forward spar. The outer ones get solid rivets, the inner ones blind rivets. At this point, the next steps required bucking and I waited for Bob to come over for that. In the meantime, I set about putting the bonding strap attachment hardware in place for the braided strap connecting the horizontal stabilizer to the elevators.
To match the connection on the elevators, I needed the attachment to be just to the outboard side of the outboard hinge. During my EAA technical counselor visit, my counselor advised me to just use AN3 bolts and anchor nuts instead of the elaborate aluminum threaded rod setup I had been using. So I'm going to try that here. I went ahead and drilled a #12 hole through the center of the hinge bracket, then put an AN3 bolt through the hole and threaded on an anchor nut. I matched drilled the holes for the anchor nut rivets through using the nut itself as the template. I made sure to cleco the first hole before drilling the second to make sure all three holes line up.
The next step was to countersink the hinge bracket for the AN426AD3 rivets, but while countersinking the first hole, I snapped the pilot tip off of my 3/32" countersink bit. The rest of this modification will have to wait on my replacement bit from Cleaveland.
Switching gears, I added the snap bushings to the aft spar and put a black RTV fillet on the forward side to keep them from vibrating loose. Having run out of things to do, I waited for Bob to show up again and then we set to work riveting.
The first thing we did were the rivets that hold the inboard ribs and forward spar together. These are in cramped quarters and cannot be squeezed. They required the long offset set for the rivet gun and were made much easier with the addition of a second person to buck.
Then we set about doing the top side forward spar skin rivets. There are a lot of these, and they take a long time. It took us about two hours to do just the top side (and we didn't do any of the stringer or inspar rib rivets, just the spar).
When we were done with that one long-ass rivet line, Bob had to go so I drilled out two rivets we had borked and fixed them, then called it a night. Here's a time lapse movie I made of the activity starting with the inboard rib rivets. Thrill to the excitement of watching us rivet and eat pizza. Woo!
Good times.
| <-- December 2009 | February 2010 --> |